Imagine if an attacker was able to compromise a privileged user at your company. The damage they could do with that identity could have permanent effects and they can continue to do that damage until someone notices.
This is was Privileged Identity Management, or PIM, is designed to stop. With PIM, we can implement just-in-time (JIT) access across a full surface of privileged access in a Microsoft cloud environment.
Why does this matter?
If you’ve ever worked on a greenfield project before, you’ve probably configured a Global Administrator account just to make sure you weren’t blocked when you needed to do administrative tasks.
Did you remember to delete it?
This is called Standing privilege where a privileged role assignment is permanently active regardless of whether it’s being used or not. Because it’s always active, the credentials that control the role assignment are a valuable target to malicious actors, because the window of opportunity is the same of the lifetime of the assignment.
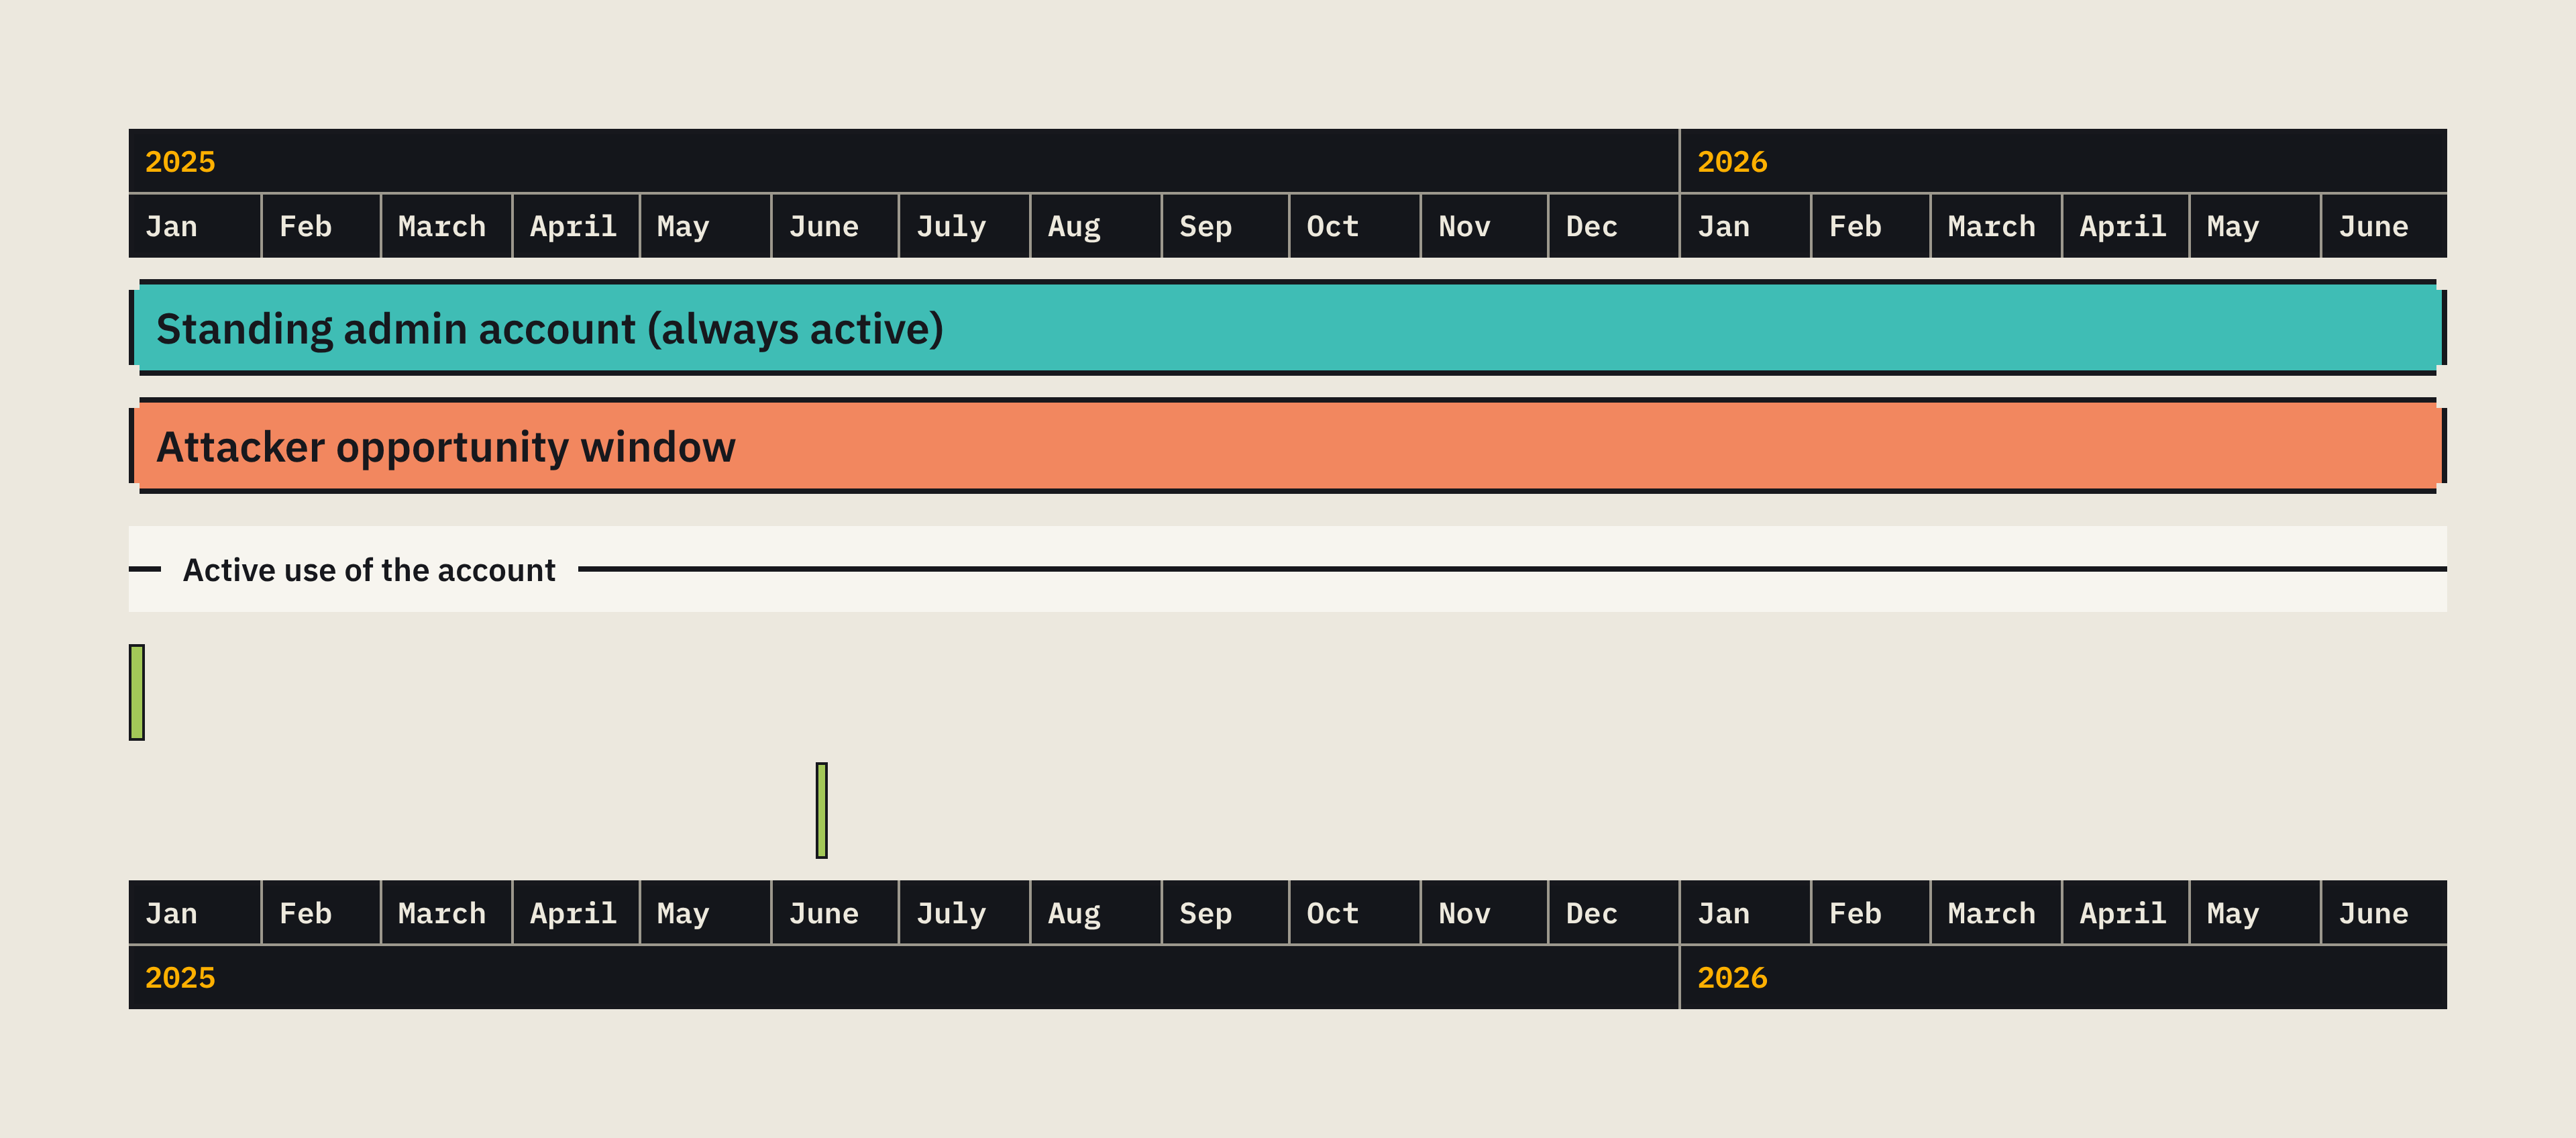
As you can imagine, if you have a Global Admin account just sitting there waiting to be compromised, the blast radius of damage has the potential to be quite destructive. For a Global Admin in Microsoft Entra ID, that would include:
- User accounts
- Group memberships
- Application registrations
- Federated trust settings
- Every Azure subscription linked to the directory!
It’s not just Global Admins either. Privileged Role Admins, Security Admins, and User Access Admins carry their own blast radiuses, and if you leave them standing there, they become permanent targets.
It’s not just humans with these privileges. AI agents, model endpoints, and automation pipelines can operate under the same permissions granted by the identity that configured them. A compromise standing Global Admin account can redirect agent behavior, exfiltrate data, or use the agent to escalate access to other systems.
Just-in-time (JIT) access provides elevated permissions that you don’t hold persistently. You can activate them for a specific task, and they expire after a defined period.
JIT access reduces the risk that standing privilege creates through 3 properties:
- You don’t have the access by default, meaning that there are no persistent credentials for an attacker to discover or steal.
- You activate access. It’s a deliberate process to elevate your permissions, which becomes an explicit, auditable event.
- Access expires automatically. If a session is compromised, permissions are timeboxed, meaning that the attacker’s window closes when the session ends.
Core capabilities of PIM
PIM implements JIT access through a set of controls. PIM supports both Microsoft Entra ID and Azure resource roles.
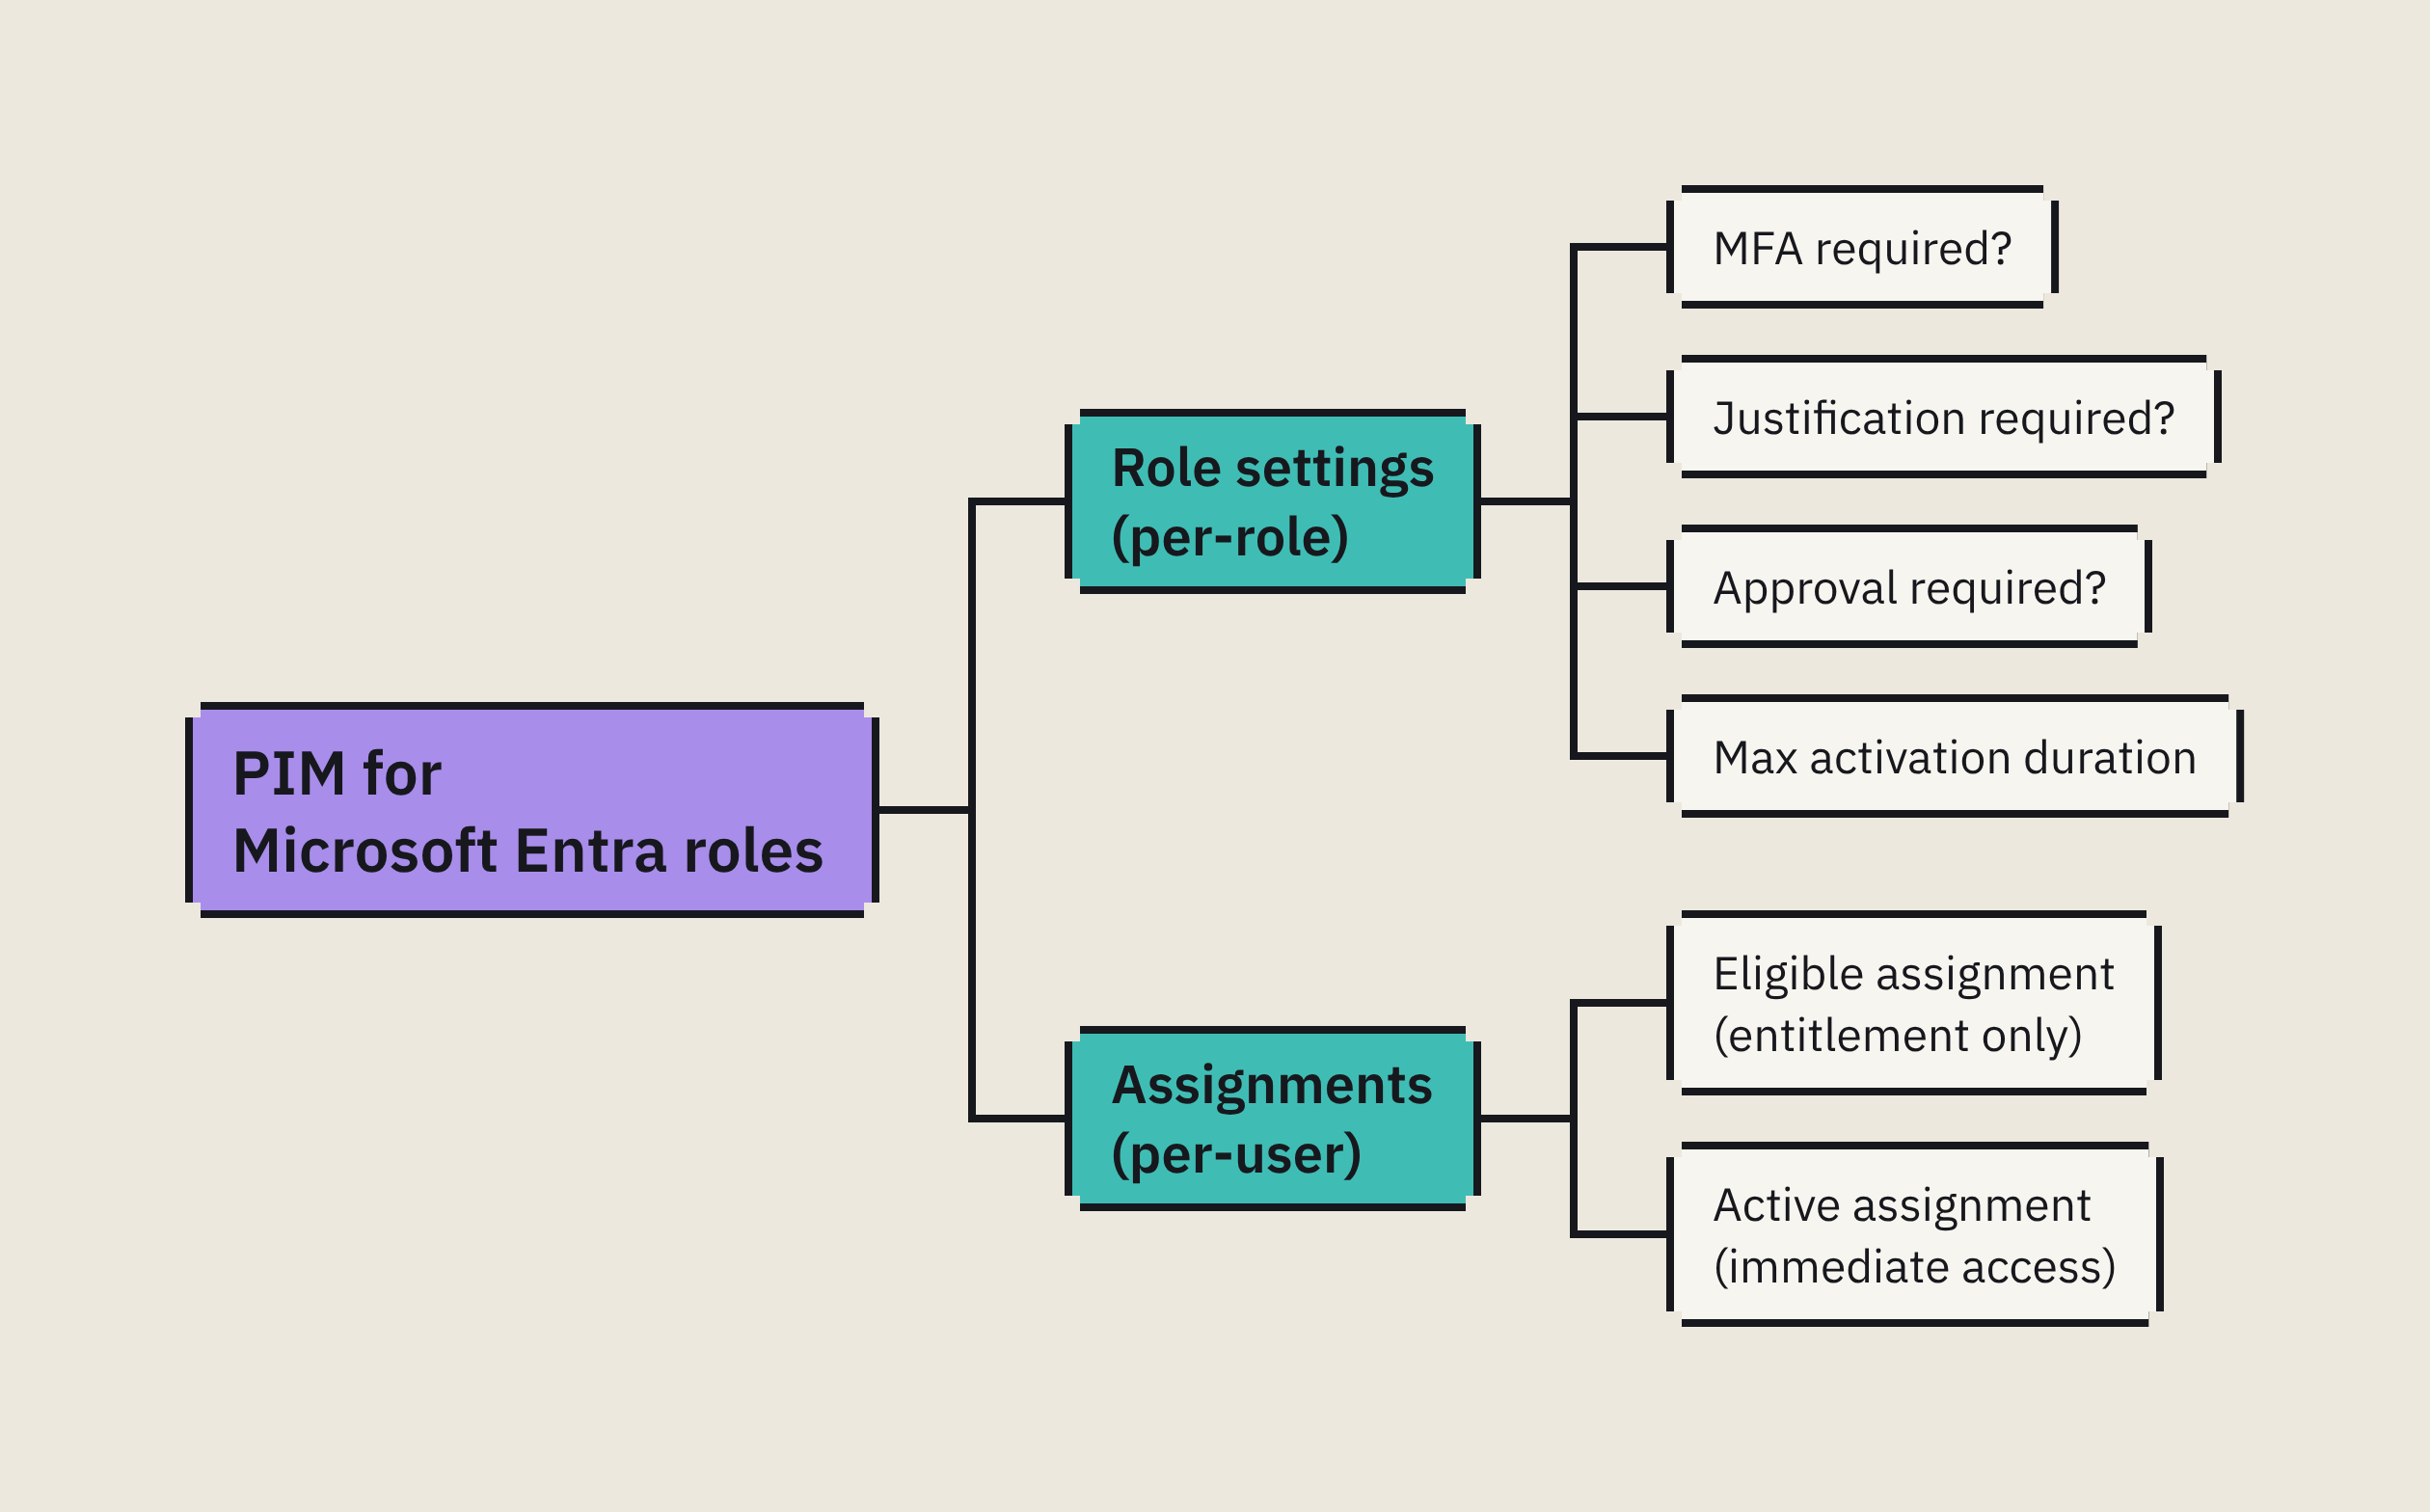
PIM uses two types of role assignments to give you control over when access is live:
- An eligible assignment
This means you hold the entitlement to a role, but don’t hold the role until you explicitly request an activation.
Activation is the act of requesting and receiving temporary elevated permissions from that entitlement, which is the JIT model in action.
- An active assignment
This grants the role directly, making access immediate without any activation step. PIM can time-bound active assignments, making them suitable for temporary standing access with a defined expiration.
This is ideal for situations where the activation step is impractical, such as break-glass emergency accounts or tightly scoped temporary roles with a defined end date.
How Activation Controls work
When you activate an eligible assignment, PIM can require you to satisfy one or more conditions before granting the role. These controls decrease the possibility of unauthorize use and ensure that if an attacker steals a credential, that alone isn’t enough to obtain elevated permissions.
These controls include:
- MFA verification, which confirms your identity before elevation, so stolen credentials alone aren’t enough to obtain the role.
- Justification, which is a written reason you must supply before PIM grants the session. This creates an auditable record of why access was requested.
- Approval, a delegated approver must confirm the request before PIM activates the role, which creates a human checkpoint for sensitive assignments.
- Activation duration, the configured time window. This is measured in hours, after which PIM will automatically remove the role.
Some roles require all of these controls, while others only require MFA verification.
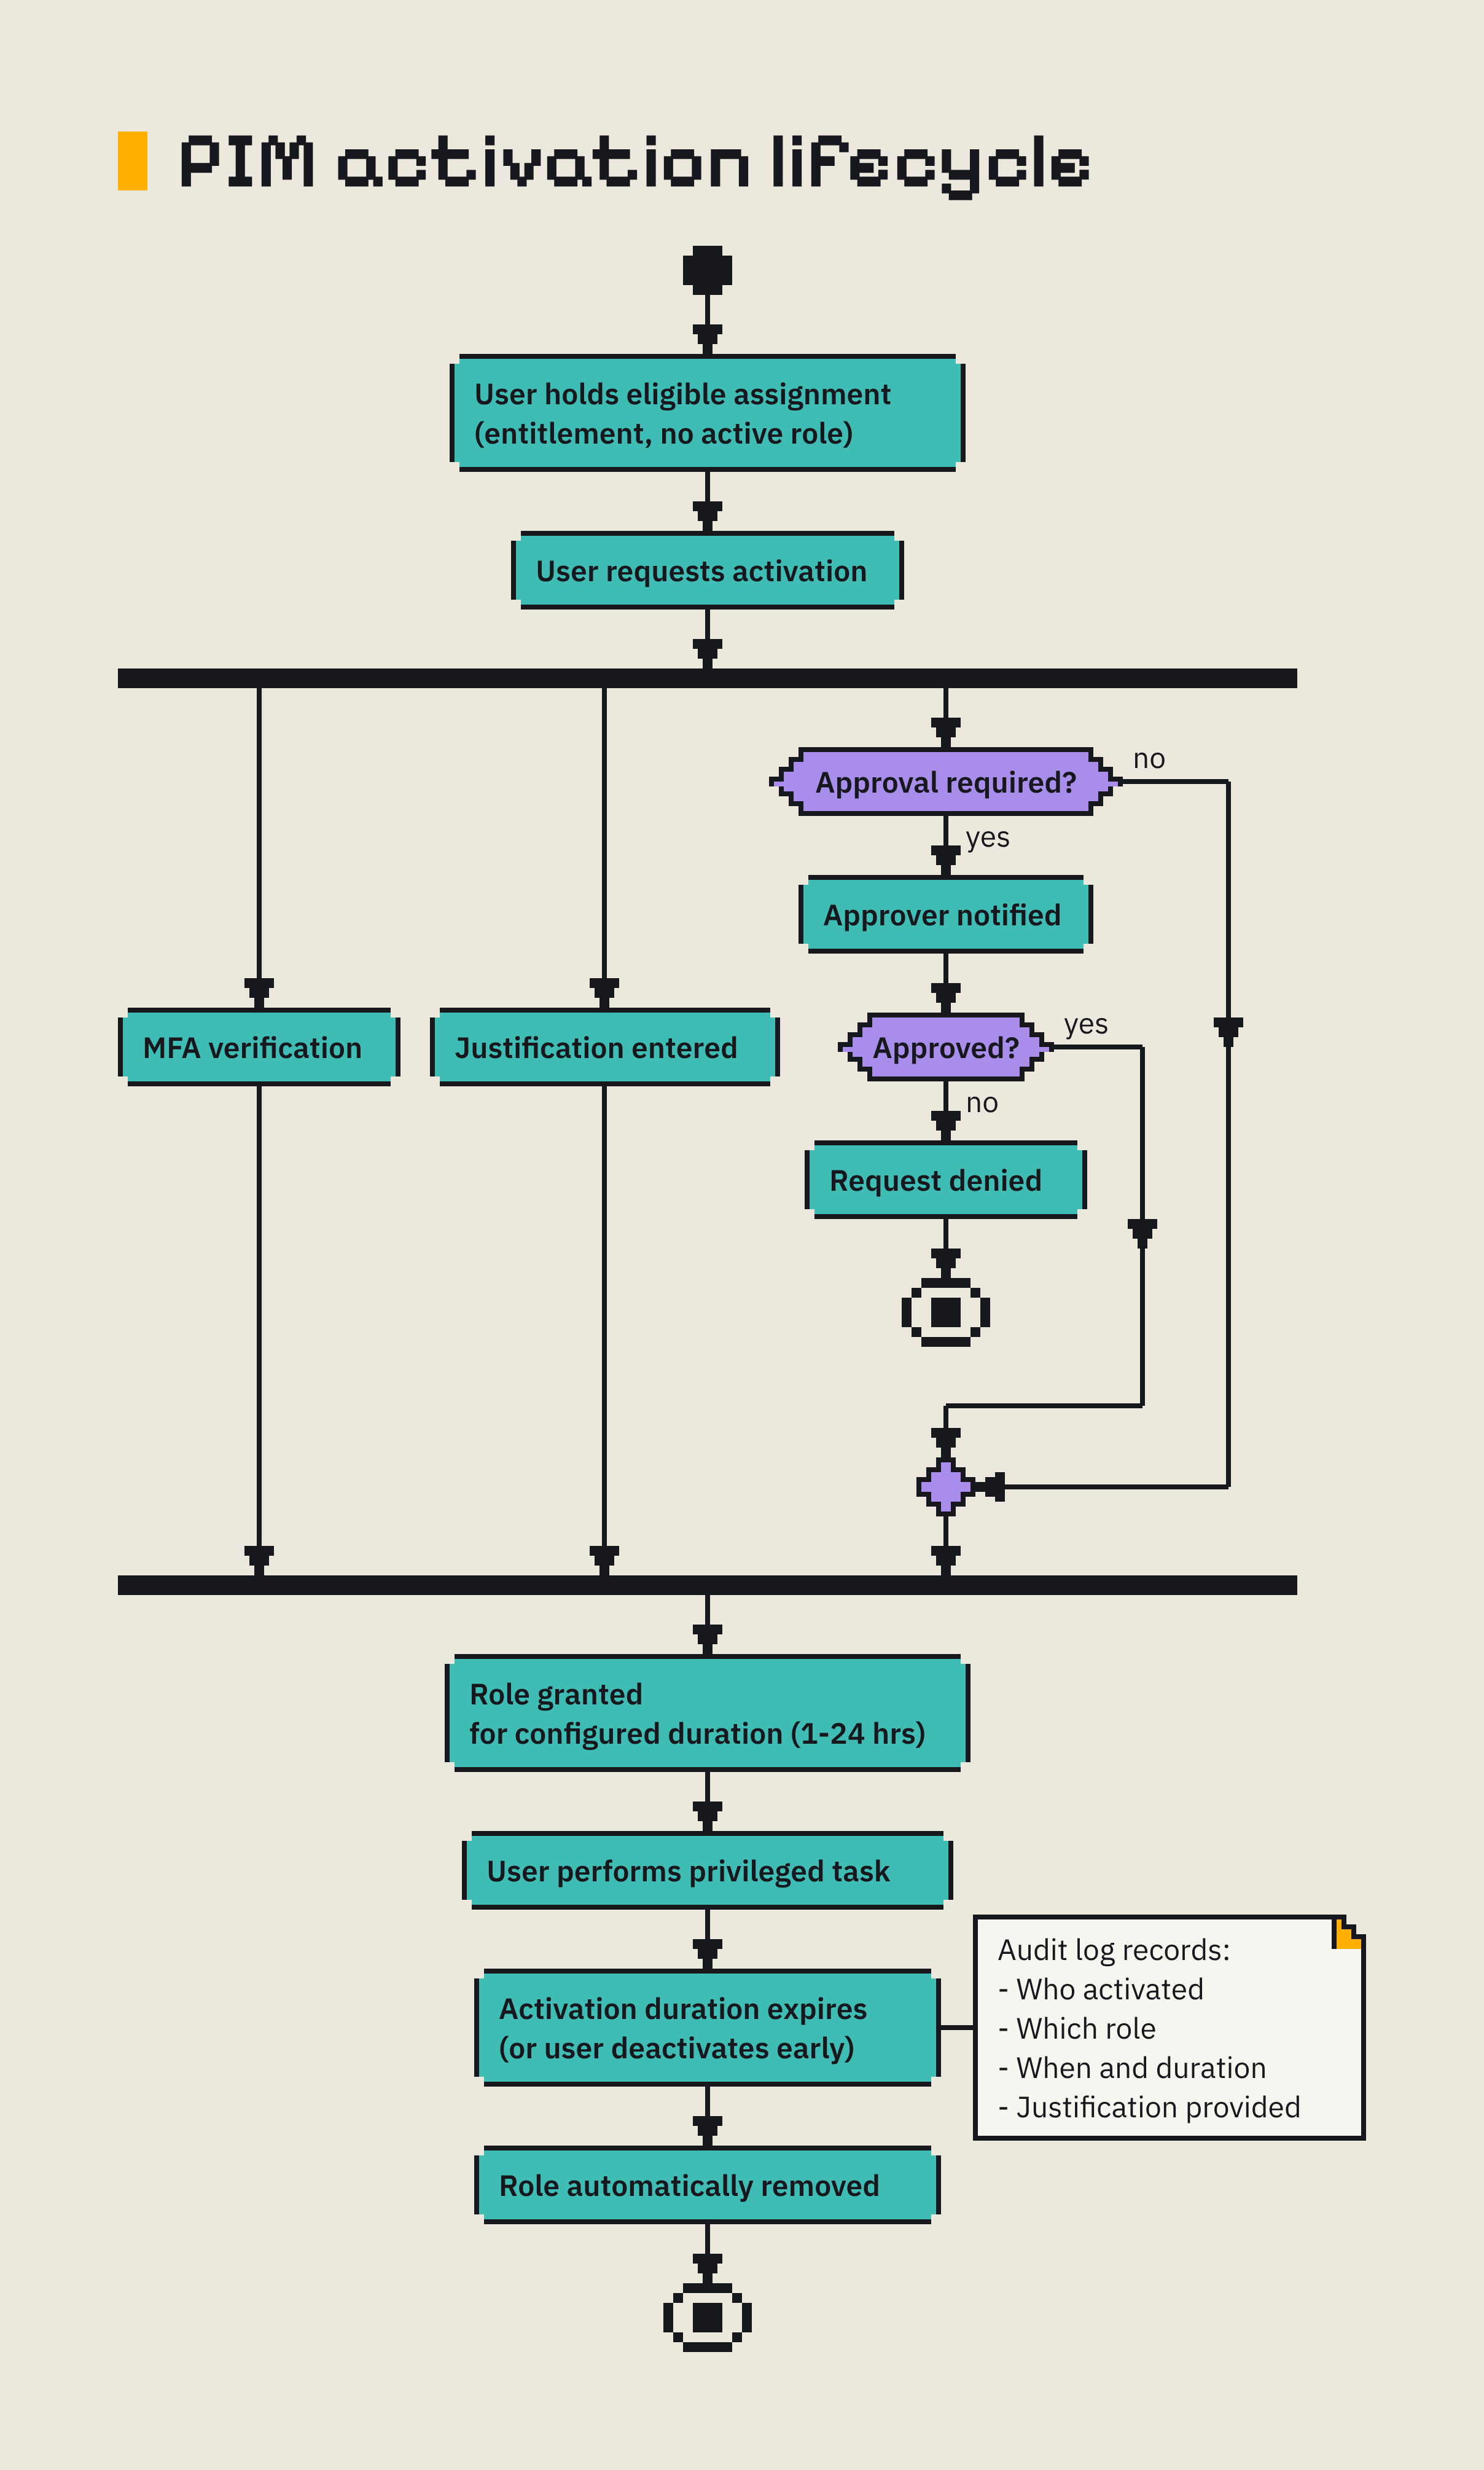
After a user activates a role, PIM sends email notifications to both the activating user and any configured approver, which creates immediate awareness that an elevated session is open. This results in a durable record of all privileged activity across your tenant.
PIM also supports access reviews, which periodically validates that eligible assignments are still appropriate.
Implementing JIT access for Microsoft Entra roles
Not every Entra role needs JIT controls, but there are a couple of high-privileged roles that have a large enough blast radius where permanent assignment of that role creates unacceptable risk.
| Role | Why JIT? |
|---|---|
| Global Administrator | Broadest blast radius in the tenant, as it gives full control over all directory settings and services. |
| Privileged Role Administrator | Can modify any role assignment, including its own! |
| Security Administrator | Controls security policy configuration across the tenant |
| Exchange Administrator | Has full access to email and calendar infrastructure |
| Application Administrator | Can register apps and modify application credentials |
| Authentication Policy Administrator | Controls authentication methods policy, tenant-wide MFA settings, and password protection policy |
Just a heads up, before you make Global Admin eligible in PIM, verify that at least 2 break-glass accounts hold a permanent active assignment to the role. Store these securely offline, because without it, a misconfiguration or an identity provider outage could lock every admin out of the tenant with no recovery path!
To assign eligible access to a Microsoft Entra role, do the following:
- Sign in to the Entra admin center and open ID Governance > Privileged Identity Management
- Under Manage, select Microsoft Entra roles
- Select the target role.
- Select Assignments > Add Assignments.
- Set Assignment type to Eligible.
- Select the member and set the assignment duration (either permanent or time-bound)
- Select Assign to complete the assignment.
Role settings are the per-role configuration in PIM that governs the conditions eligible users must satisfy before PIM grants access to that role. These settings apply to all eligible users of a given role. Configuring these roles only determine what conditions must be met when an eligible user activates the role, it doesn’t create the assignment.
To activate an eligible Microsoft Entra role, perform the following steps:
- In PIM, select My roles > Eligible assignments.
- Find the role and select Activate.
- Set the activation duration.
- Enter a justification describing the task that requires elevated access.
- If approval is required, submit the request and wait for approval.
- Confirm the role appears under Active assignments with a duration countdown.
Implementing JIT access for Azure roles and resources
Azure RBAC operates across a nested scope hierarchy, starting from a management group, then subscription, resource group, and individual resource. Assignments at a broader scope inherit downwards, so an Owner assignment at the subscription level would grant ownership over every resource group and resource within it.
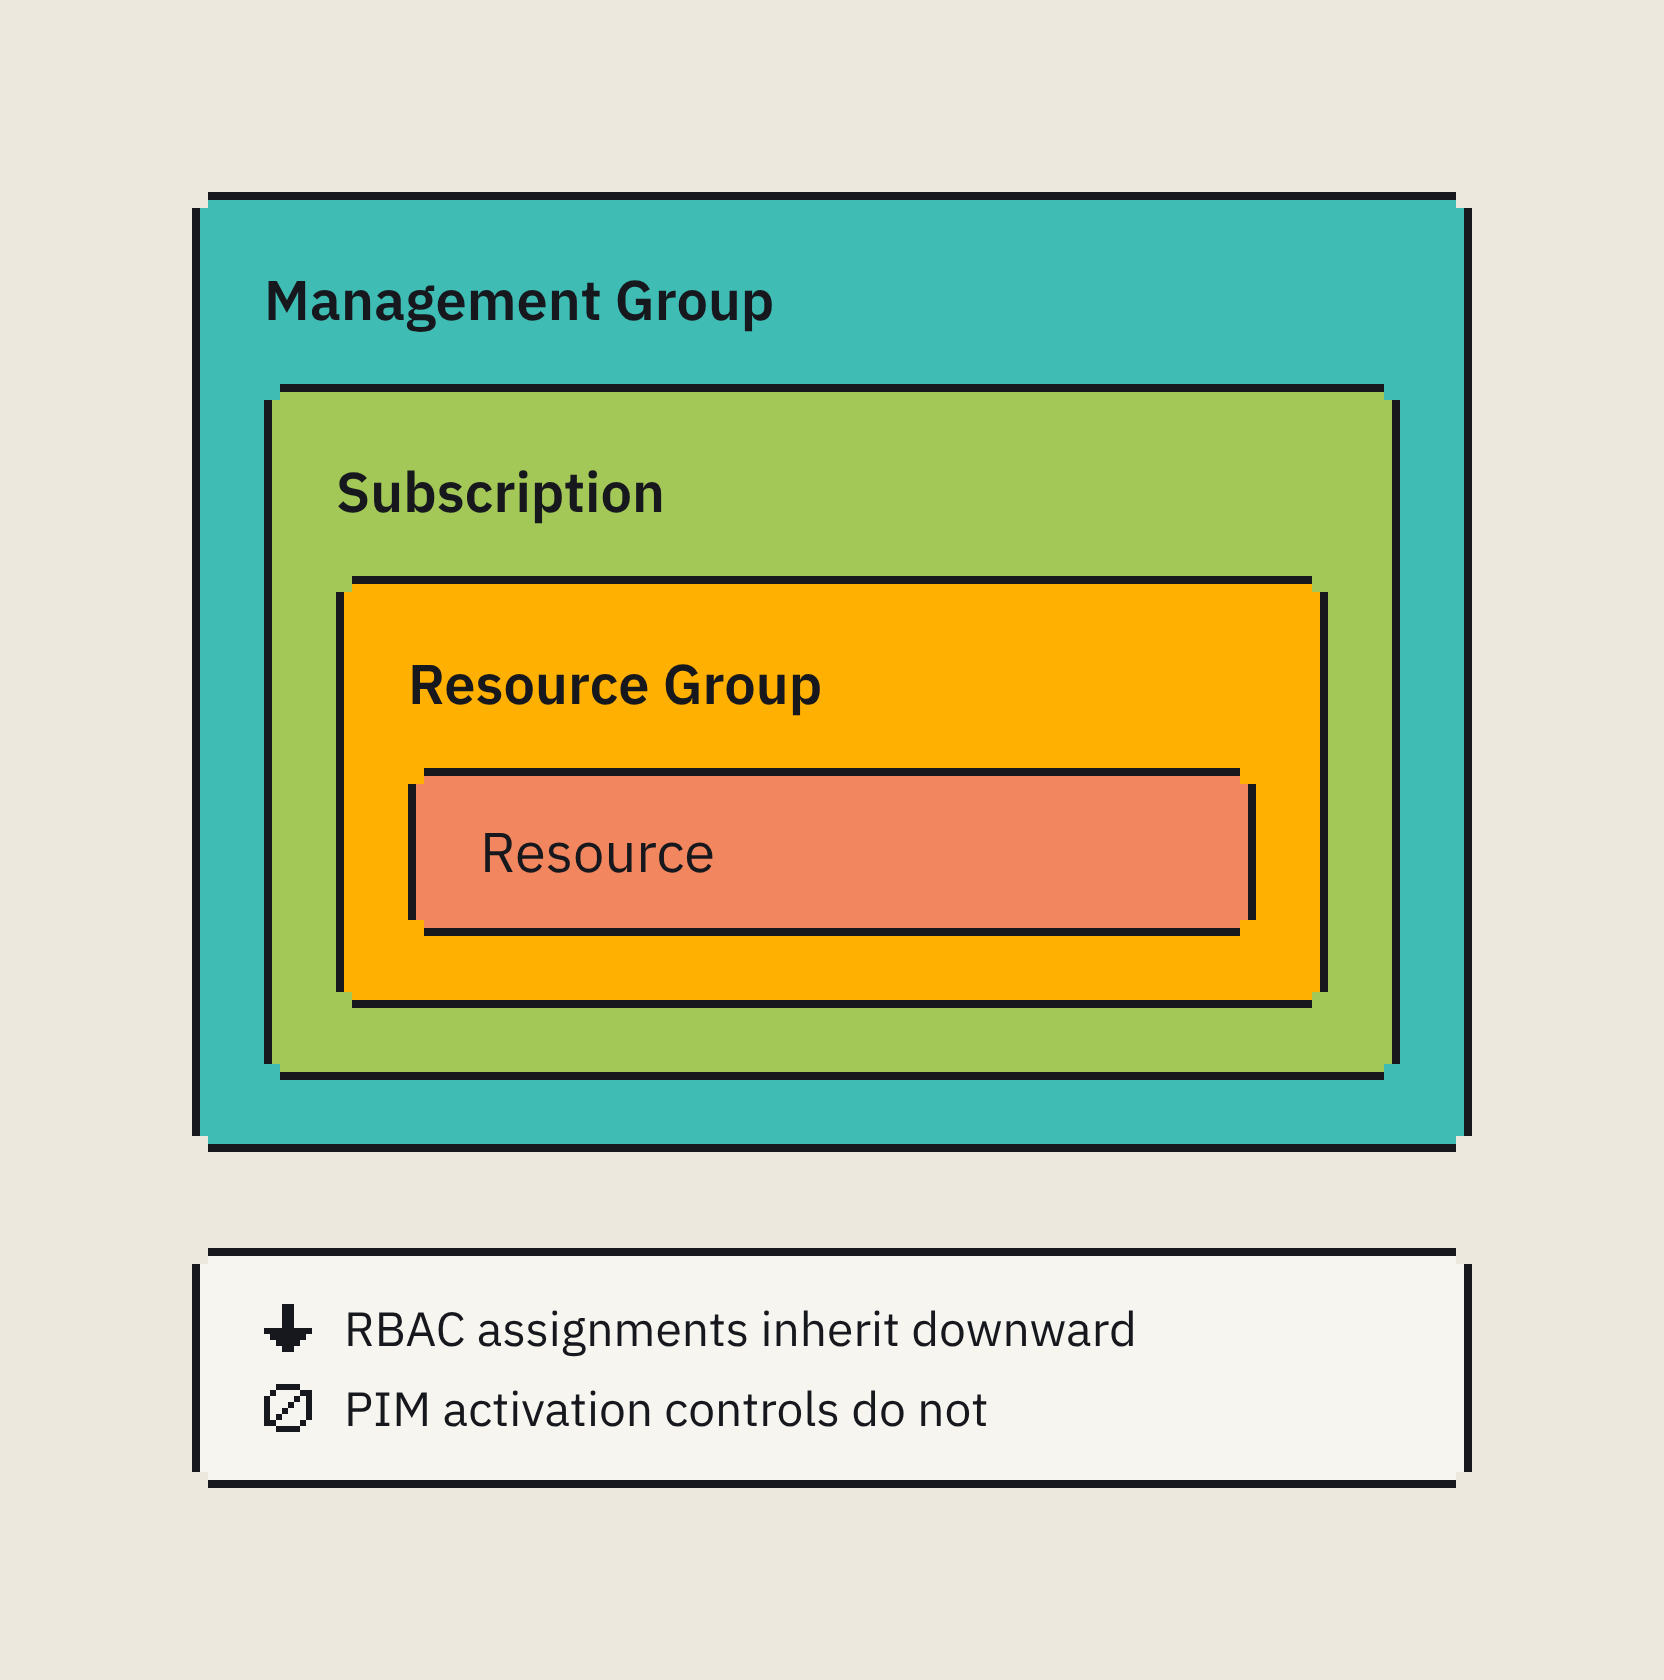
PIM surfaces this same hierarchy, letting you make users eligible at the subscription, resource group, or individual resource level. This scope selection is important, as assigning eligibility at a narrower scope limits the potential damage from a compromised activation.
With Azure RBAC, you’re managing RBAC assignments on Azure control-plane objects rather than directory identities, so it’s important to keep that distinction in mind to prevent inadvertently configuring the wrong target when managing resources.
Not every Azure resource has the same risk from a compromised Owner or Contributor role. It depends on the following factors:
- Data sensitivity.
- Blast radius.
- Regulatory exposure.
- Reversibility of any damage.
You can apply resources to a risk tier so you can apply the strictest controls where they make sense. For example:
| Risk tier | Resource examples | Why this level of risk? | Recommended controls |
|---|---|---|---|
| Critical | Production subscription | Compromise grants lateral movement | MFA required, justification required, approval required, 1-2 timebox |
| High | Production resource group | Narrower scope but high data sensitivity or service continuity risk | MFA required, justification required, approval optional, 4-8 max |
| Standard | Dev/Test resource groups | Low data sensitivity, mistakes can be reversed | MFA required, justification required, no approval, up to 8 hours |
Once you’ve done your tier analysis, you can apply access to an Azure resource as follows:
- In PIM, select Azure resources.
- Navigate to the target resource using the Subscriptions or Resource groups dropdown, and under Manage, select Roles, then select Add assignments.
- Select the Azure resource role.
- Set Assignment type to Eligible.
- Select the member and configure the assignment duration.
- Select Assign to complete the assignment.
To activate an eligible Azure resource role, go to My roles in PIM, select the Azure resources tab to see your eligible assignments, and select Activate.
The difference is that you configure role settings for Azure resource roles independently per role per resource scope. This provides us with a flexible approach to apply stricter requirements on different resources depending on their sensitivity (e.g. production vs development resources).
Scaling PIM with Groups
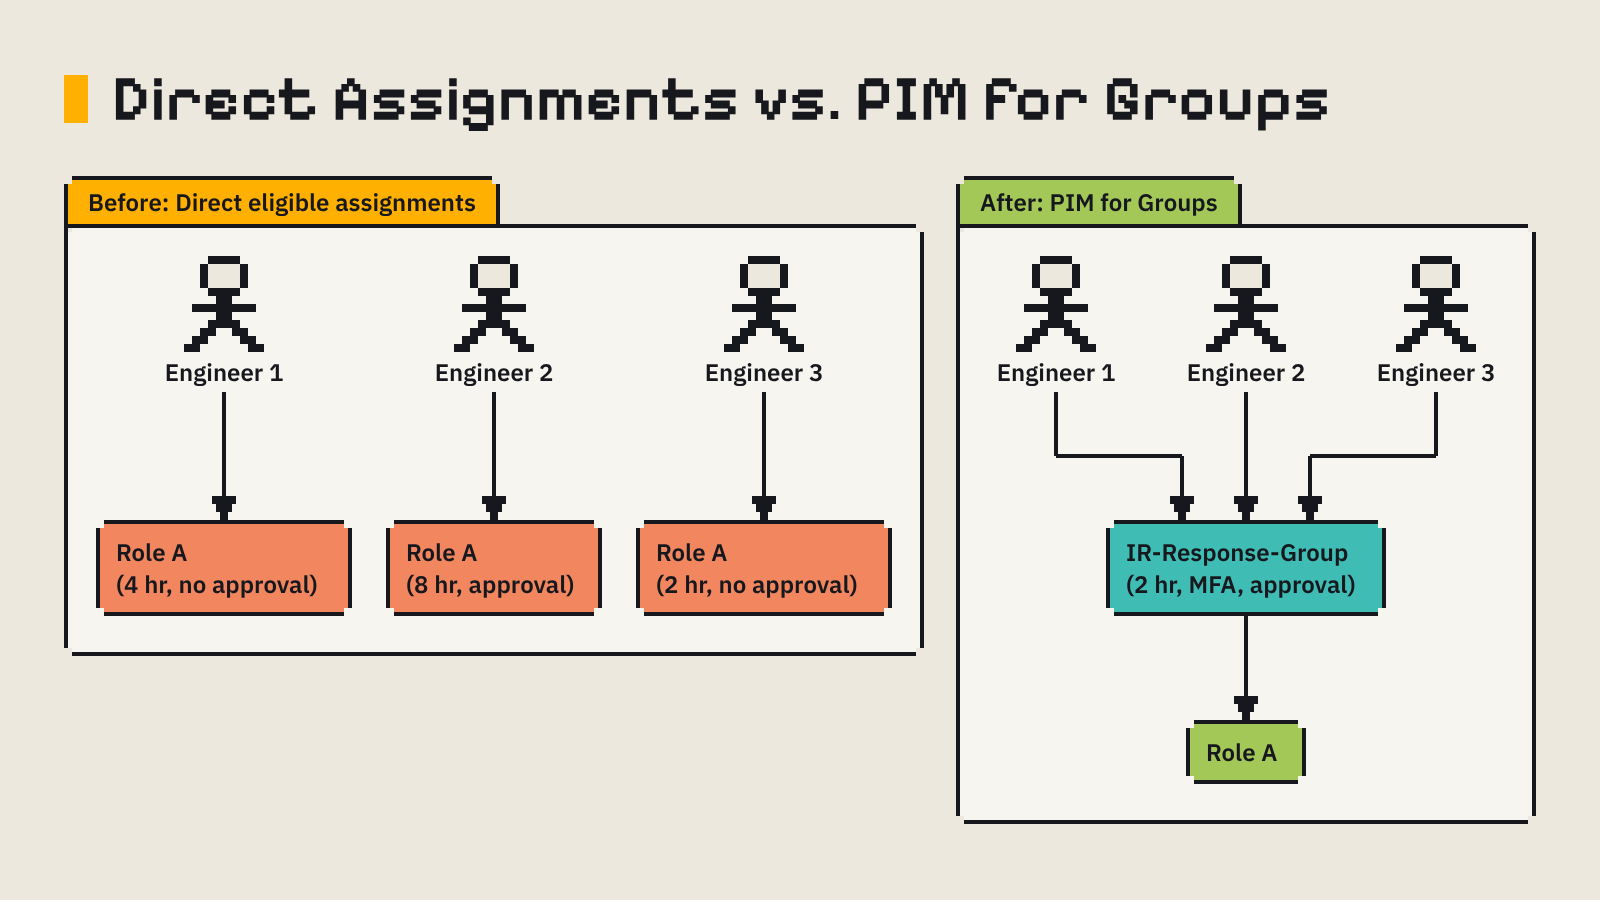
Configuring JIT access for one or two engineers is pretty straightforward. Doing it individually for a group of engineers would be a pain, as that would require a separate eligible assignment, each one carrying its own role settings, its own maximum activation duration, own approvers list etc.
PIM for Groups shifts the eligible resource from a role to a group membership, so instead of making each engineer eligible for a role, you create a group, assign that group the role, and make each engineer eligible for membership in that group. When an engineer activates their membership, they gain all the roles the group holds. When the activation expires, membership ends, and access is revoked.
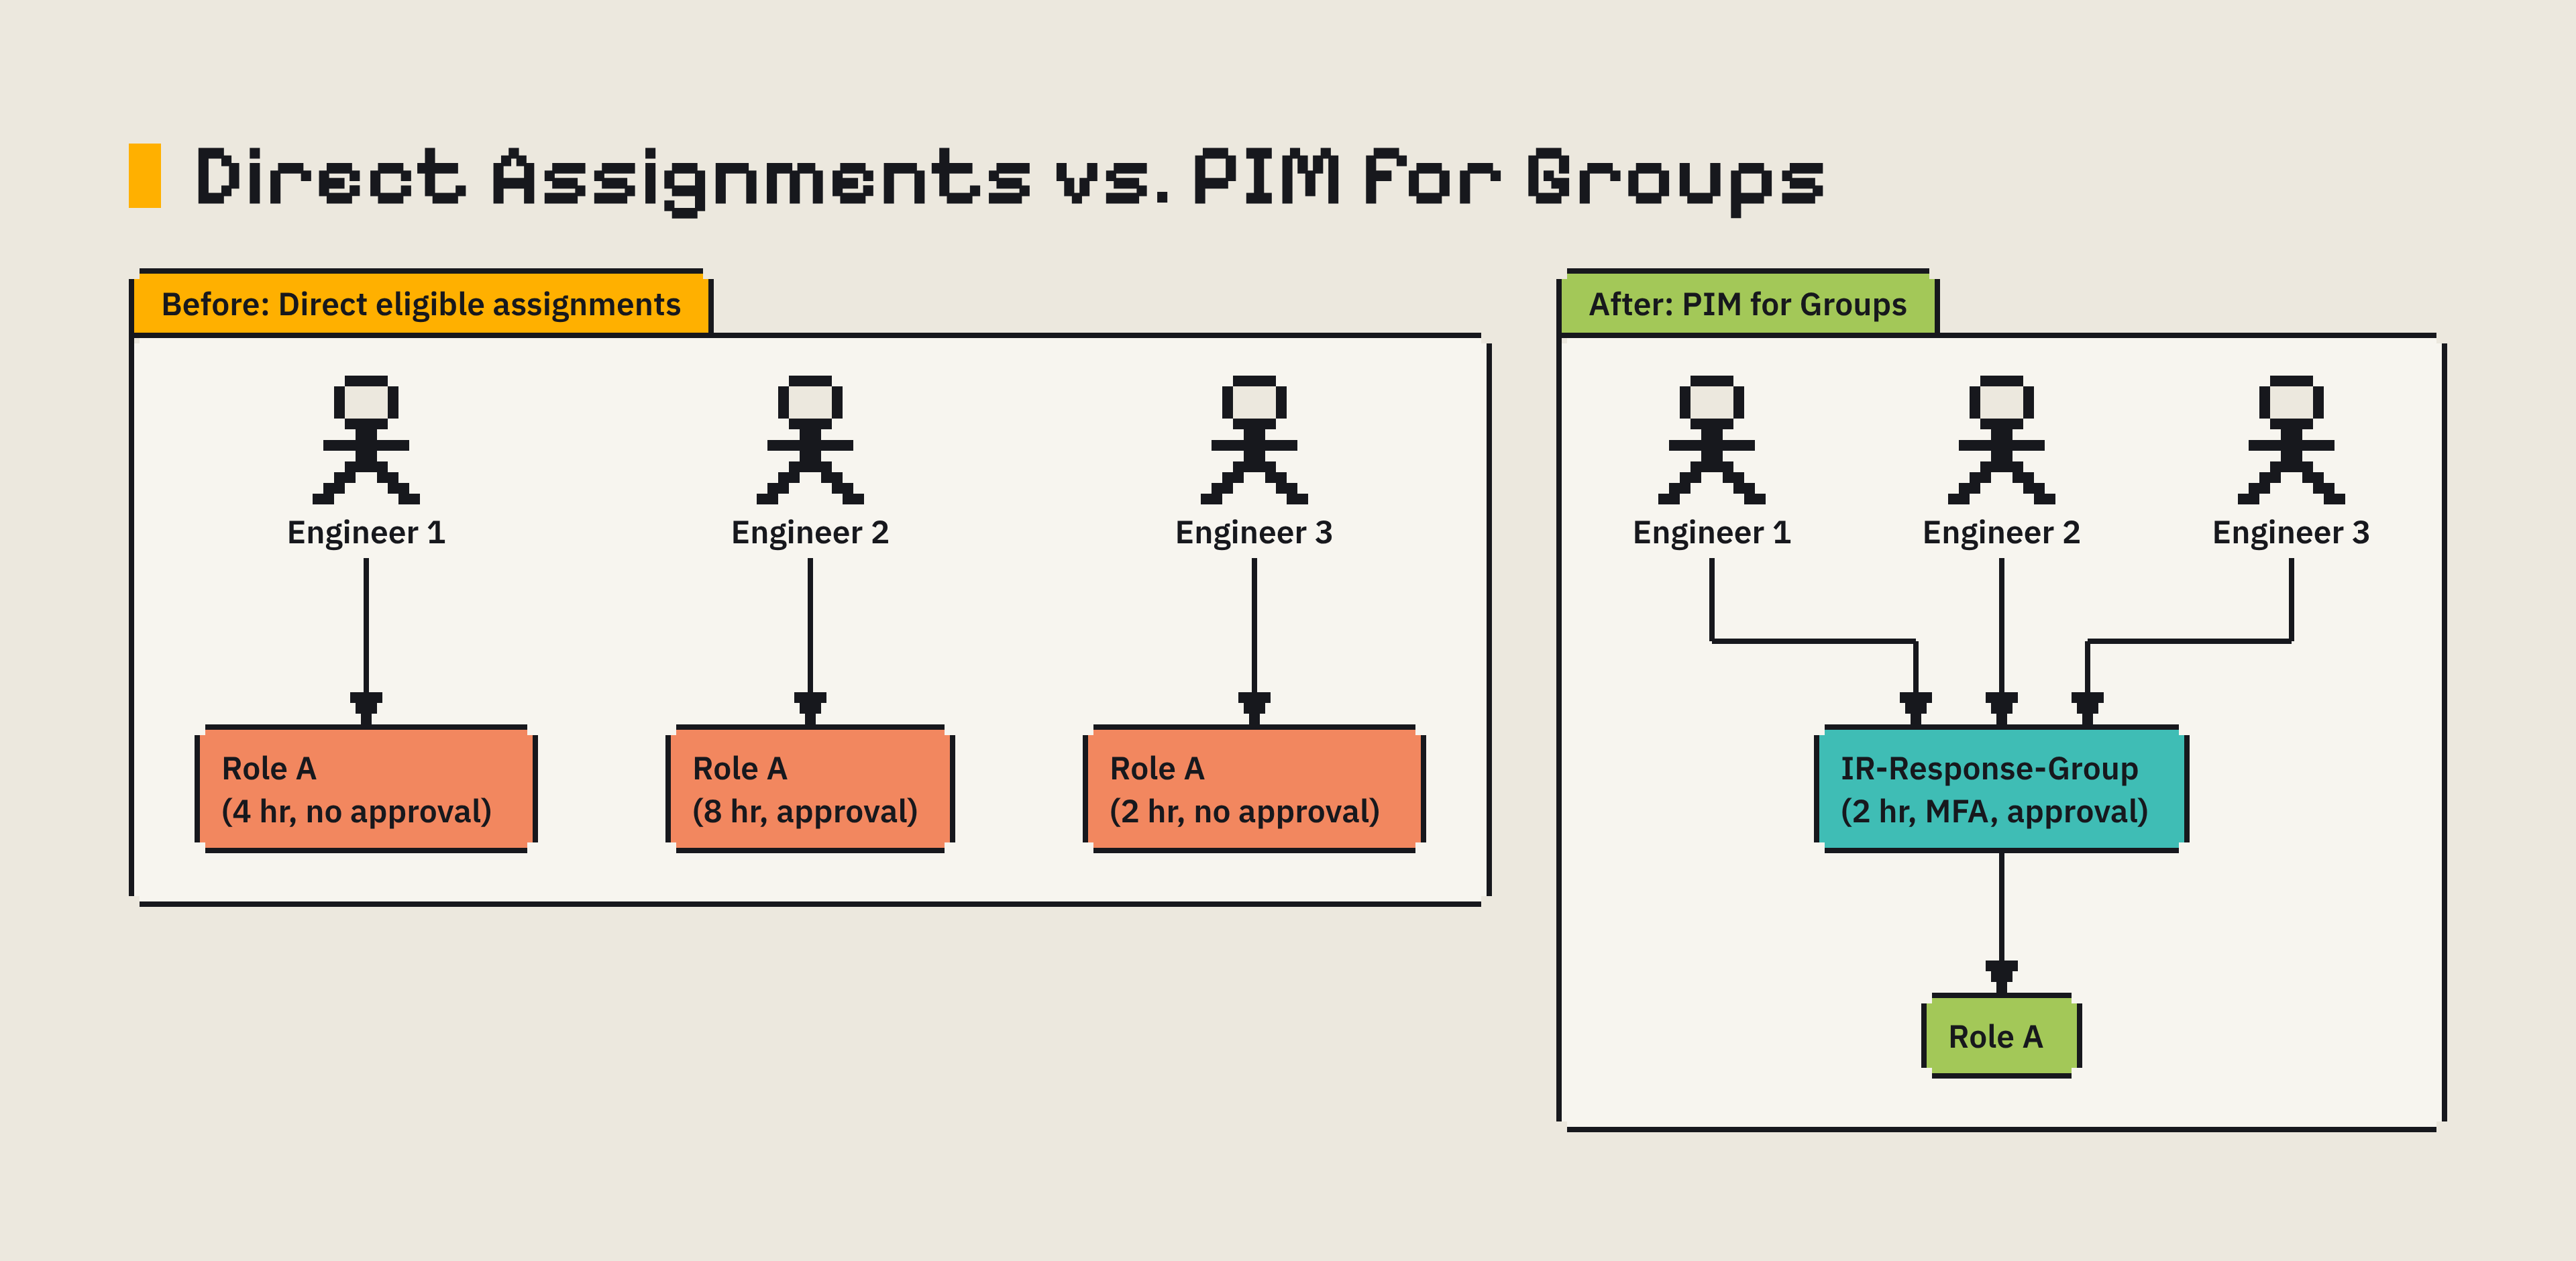
For groups that need to govern access to sensitive resources, use a role-assignable group. Standard Microsoft Entra ID groups are modified by its owners, or by lower-privileged admins such as Groups Administrator, without triggering approvals or audit entries in PIM.
Wrapping up
Hopefully you have a better idea on how to configure PIM for both Microsoft Entra ID roles and Azure resources. Using PIM can help structure better privileged access design in your environments, and provide safeguards against malicious actors who can potentially use standing privilege to exploit your workloads.
If you have any questions, feel free to reach out to me on X @willvelida or on Bluesky
Until next time, Happy coding! 🤓🖥️