We can use Azure Key Vault to securely store and control access to sensitive information. We can use it to handle secrets (things like database connection string, passwords, API tokens etc.), cryptographic keys (used for encrypting and decrypting data), and certificates (SSL/TLS certificates used to secure communications).
However, just having a Key Vault by itself doesn’t automatically make your application secure. We can deploy Azure Key Vaults with soft delete and purge protections to protect our vaults from accidental deletions, we can configure RBAC-based access controls, just-in-time activations using PIM, and we can lock down our Key Vaults using firewall rules, virtual networks, and private endpoints.
In this blog post, we’ll talk about how we can set up our Key Vaults properly for enterprise scenarios, with the right security, access, and network controls that will help protect your sensitive information from being compromised.
Deploying Azure Key Vault with security controls
The first thing you need to consider is what SKU do you need. Azure Key Vault provides two tiers:
- Standard, which protects keys using software-based encryption. The key never leaves Azure, but it’s not backed by dedicated hardware. For most workloads, this level of protection is fine.
- Premium, which protects keys with a hardware security module (HSM) validated to Federal Information Processing Standard (FIPS) 140-3 Level 3. The key is created inside the HSM and never gets exported in unencrypted form.
Once you’ve decided what SKU you need, you’ll need to set some critical properties on the Key Vault when you deploy the vault.
Soft delete preserves deleted vault objects (keys, secrets, and certificates) that can be recovered within a configured period of between 7 to 90 days. During this window, any deleted objects can be recovered.
Soft delete in enabled by default on all new vaults and can’t be disabled after you create the vault. The retention period can also only be set when you create the vault.
Purge protection prevents Key Vaults and objects from being purged permanently. Without this, any identity with the right level of permissions can delete objects and vaults, and purge them! Imagine if you’re encrypting your data at rest using cryptographic keys in Key Vault, and someone deleted that key! Good luck trying to read that data again!
Finally, when you create the vault, Public network access is enabled by default, which means that any internet IP address can try to authenticate with your Key Vault.
That doesn’t mean that the vault is unprotected, you still have to have a valid Microsoft Entra token and the appropriate role assignment over the vault, it’s just that the endpoint is exposed to the public internet, which expands the attack surface.
Configuring soft delete and purge protection for Key Vault is pretty straightforward in Bicep.
@description('Globally unique name for the Key Vault.')
param keyVaultName string

resource keyVault 'Microsoft.KeyVault/vaults@2024-11-01' = {
  name: keyVaultName
  location: 'australiaeast'
  properties: {
    tenantId: tenant().tenantId
    sku: {
      family: 'A'
      name: 'standard'
    }
    enableSoftDelete: true
    softDeleteRetentionInDays: 90
    enablePurgeProtection: true
    enableRbacAuthorization: true
  }
}
We can enforce vault configuration at scale using Azure Policy. There are two built-in policies that help us apply soft-delete and purge-protection settings at scale:
- Key vaults should have soft delete enabled. This helps identify vaults without soft delete configured.
- Key vaults should have deletion protection enabled. This audits existing vaults and can block creation of new vaults that don’t have purge protection enabled.
Assign these policies at either the subscription or management group scope to ensure every vault meets these requirements. You can also combine it with a remediation task to bring update existing vaults that don’t have this enabled.
Configuring access to Azure Key Vault
Access in Azure Key Vault can be divided into the control plane and the data plane
The control plane governs the Key Vault itself. Operations use Azure Resource Manager (ARM) and include creating or deleting the vault, configuring network rules, and viewing metadata.
The data plane governs objects stored inside the vault. Both planes authenticate through Microsoft Entra ID, but authorization is independent on each plane.
Having this separation between the two planes helps improve security, since you can assign control-plane access to identities that only need to manage the vault as infrastructure, and data-plane access to those identities that need to work with Key Vault objects.
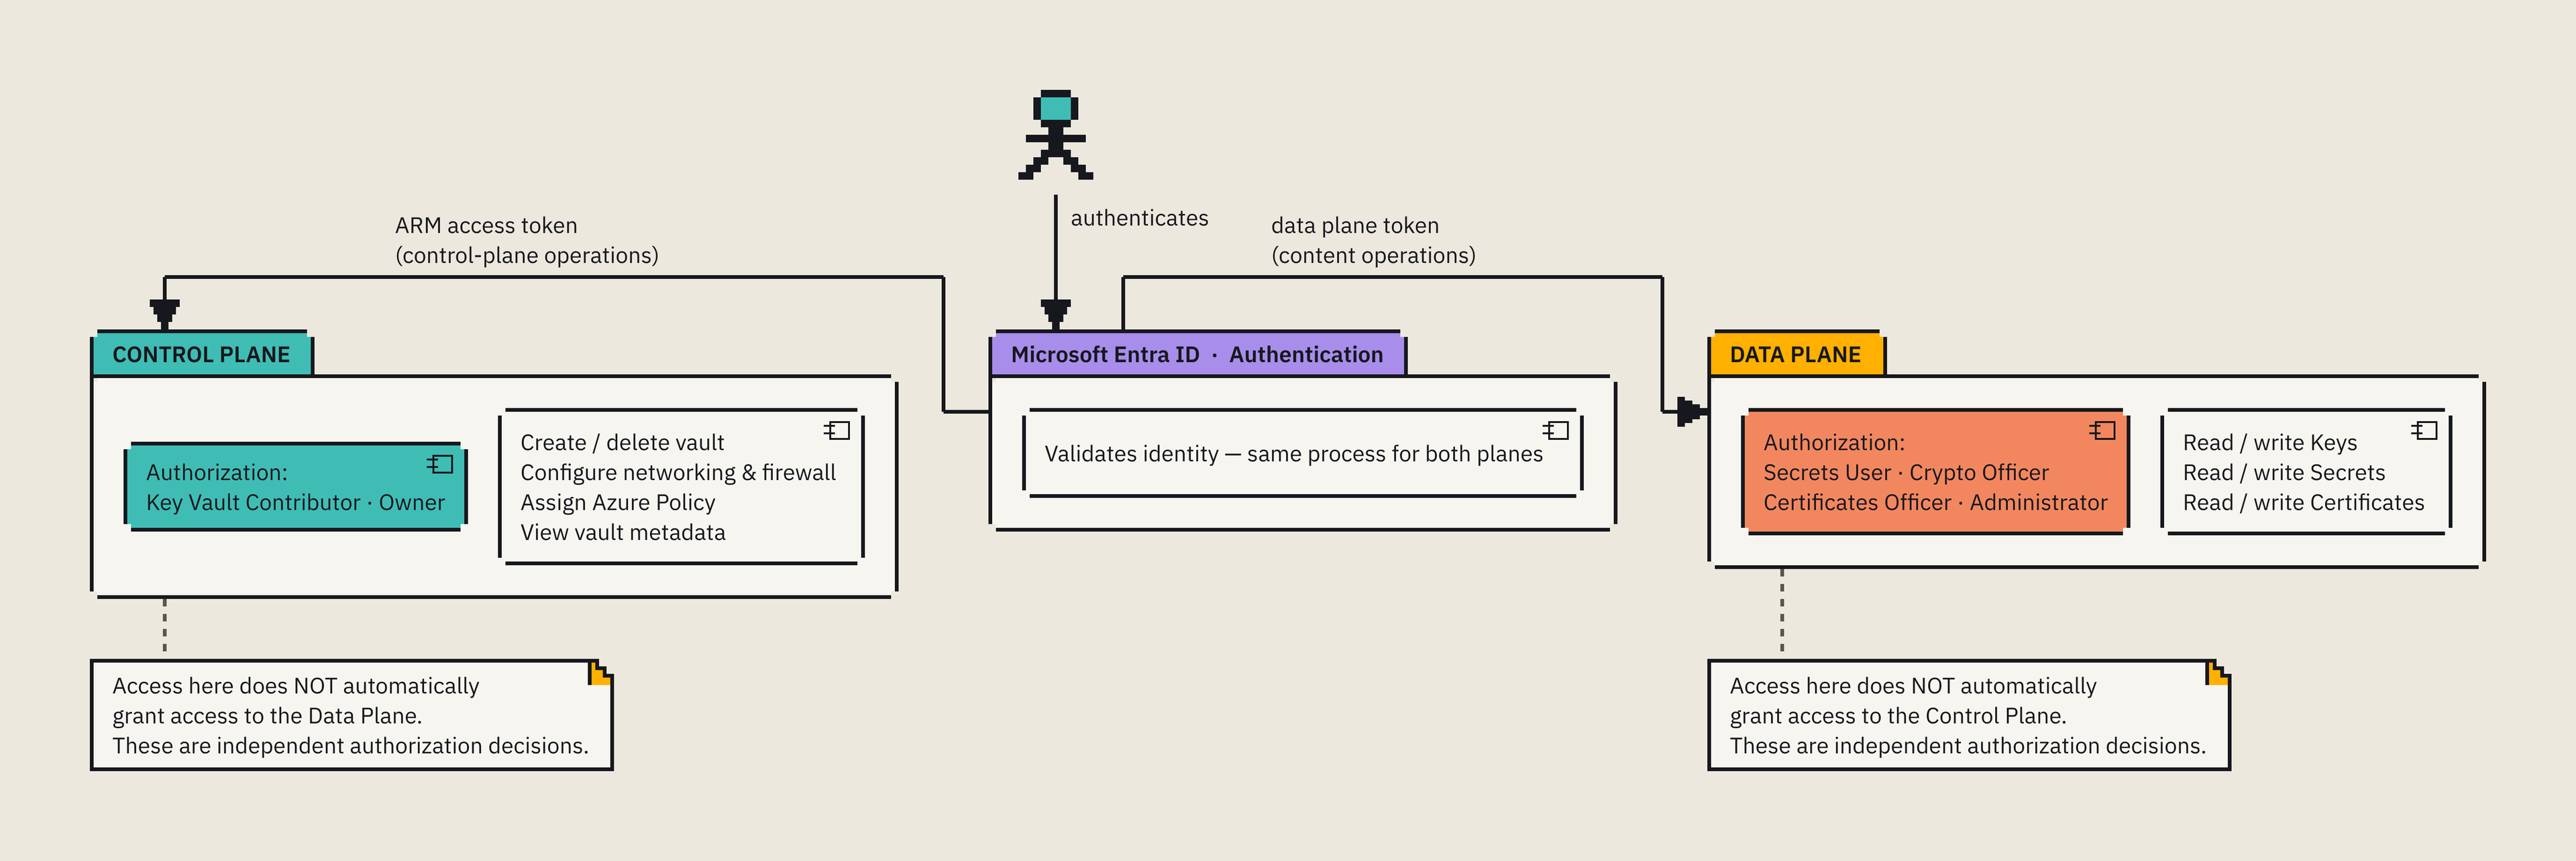
Microsoft Entra ID authenticates both planes, but separate role assignments determine whether an identity can manage the vault or work with its contents.
Key Vault supports two authorization models for the data plane: Azure RBAC and legacy vault access policies. These vault access policies are being retired, so I’ll just discuss how Azure RBAC works for Key Vault, and tell you that if you’re still using legacy access policies in your Key Vault, migrate to RBAC now!.
Azure RBAC provides roles for Key Vault operations across both planes.
| Role | Plane | What it governs |
|---|---|---|
| Owner, Contributor | Control plane | The vault resource itself |
| Key Vault Administrator, Secrets User, Certificates Officer, Purge Operator | Data plane | The vault content |
Let’s take a closer look at some RBAC roles that you can apply in Key Vault.
Key Vault Administrator grants full data-plane access to all objects in the Key Vault. This role is the most powerful role, so don’t grant it on a permanent basis and reserve it for break glass scenarios or automation that genuinely needs cross-object access.
Key Vault Secrets User grants read-only access to secret values. This is the right role for application service principles and managed identities that need to retrieve runtime secrets such as API keys and connection strings. This role only allows the identity to read the secret content, not create, update, or delete secrets.
Key Vault Certificates Officer allows full lifecycle management of certificates, including creating, importing, updating, and deleting certificates. With this role, you cannot touch secrets or keys.
Key Vault Purge Operator allows users to permanently delete soft-deleted vault objects. This role should only be used in explicit recovery or decommissioning scenarios, where you intend to purge soft-deleted objects.
To assign an RBAC role over the Key Vault in Bicep, we can do the following:
@description('Microsoft Entra object ID of the user.')
param userObjectId string

var secretsUserRoleId = subscriptionResourceId(
  'Microsoft.Authorization/roleDefinitions',
  '4633458b-17de-408a-b874-0445c86b69e6'
)

resource secretsUserAssignment 'Microsoft.Authorization/roleAssignments@2022-04-01' = {
  name: guid(keyVault.id, userObjectId, secretsUserRoleId)
  scope: keyVault
  properties: {
    roleDefinitionId: secretsUserRoleId
    principalId: userObjectId
    principalType: 'User'
  }
}
We can also use Privileged Identity Management (PIM) to eliminate the need to grant these roles permanently. If a user needs elevated Key Vault access, they can request activation of that role through PIM, which can use controls like MFA verification, justification, approvals, and time durations to limit access of the role.
Microsoft Entra Conditional Access let you apply policy-based controls to Key Vault access, such as requiring MFA for access from unmanaged or noncompliant devices, blocking access from risky sign-in locations, or limit access to requests that originate from locations or network paths you trust.
Configuring firewall and network settings for Azure Key Vault
By default, public network access is enabled when creating Key Vaults, making it reachable by any internet IP address.
The first thing we can do to increase network security on the Key Vault is enable the firewall and add explicit allow rules. Once you enable the firewall, all traffic is blocked by default, and only specific IPv4 addresses or Classless Inter-Domain Routing (CIDR) ranges that are defined will have access.
This is handy for situations where you have workloads or agents running on known IP addresses, and you enable that IP address on the firewall.
We can enable firewall access on Key Vaults in Bicep like so:
@description('Globally unique name for the Key Vault.')
param keyVaultName string

@description('Public IPv4 addresses or CIDR ranges allowed through the firewall.')
param allowedIpAddressesOrRanges array

resource keyVault 'Microsoft.KeyVault/vaults@2024-11-01' = {
  name: keyVaultName
  location: 'australiaeast'
  properties: {
    tenantId: tenant().tenantId
    sku: {
      family: 'A'
      name: 'standard'
    }
    enableSoftDelete: true
    softDeleteRetentionInDays: 90
    enablePurgeProtection: true
    enableRbacAuthorization: true
    publicNetworkAccess: 'Enabled'
    networkAcls: {
      bypass: 'None'
      defaultAction: 'Deny'
      ipRules: [
        for addressOrRange in allowedIpAddressesOrRanges: {
          value: addressOrRange
        }
      ]
      virtualNetworkRules: []
    }
  }
}
We can take this further and disable public access entirely, but only after we create a private endpoint or virtual network rule. If we don’t have this, we’ll lock ourselves out of the vault!
Bear in mind that firewall rules only apply to data plane operations, not the control plane. Private IP address ranges cannot be used in IP allow list rules. In dynamic environments, this approach can be limited, as allow lists would need to be updated each time our infrastructure changes.
An alternative to this is to use Virtual network service endpoints inside an Azure virtual network. When we enable the Microsoft.KeyVault service endpoint on a virtual network subnet and add it to our Key Vault network rules, traffic from that subnet travels over the Azure backbone network, rather than than the public internet.
Configuring a service endpoint for our Key Vault can be done in Bicep like so:
param virtualNetworkName string
param subnetName string

@description('Subnet CIDR within the virtual network address space, without overlapping existing subnets.')
param subnetAddressPrefix string

@description('Globally unique name for the Key Vault.')
param keyVaultName string

resource virtualNetwork 'Microsoft.Network/virtualNetworks@2024-05-01' existing = {
  name: virtualNetworkName
}

resource subnet 'Microsoft.Network/virtualNetworks/subnets@2024-05-01' = {
  parent: virtualNetwork
  name: subnetName
  properties: {
    addressPrefix: subnetAddressPrefix
    serviceEndpoints: [
      {
        service: 'Microsoft.KeyVault'
      }
    ]
  }
}

resource keyVault 'Microsoft.KeyVault/vaults@2024-11-01' = {
  name: keyVaultName
  location: 'australiaeast'
  properties: {
    tenantId: tenant().tenantId
    sku: {
      family: 'A'
      name: 'standard'
    }
    enableSoftDelete: true
    softDeleteRetentionInDays: 90
    enablePurgeProtection: true
    enableRbacAuthorization: true
    publicNetworkAccess: 'Enabled'
    networkAcls: {
      bypass: 'None'
      defaultAction: 'Deny'
      ipRules: []
      virtualNetworkRules: [
        {
          id: subnet.id
          ignoreMissingVnetServiceEndpoint: false
        }
      ]
    }
  }
}
Service endpoints are an improvement over IP-based rules for Azure workloads, as traffic stays on the Azure backbone and never crosses onto the public internet.
However, Key Vault is has a public endpoint and it’s DNS name still resolves to a public IP.
We can fully isolate our Key Vault using Private Endpoints. Once we combine a private endpoint with disabling public network access, the vault is no longer reachable through the public internet. The only way to connect to the vault is through your virtual network, or through connected networks such as Azure ExpressRoute or site-to-site VPN.
To get this to work correctly, we’ll need a private endpoint resource, which is a network interface in your virtual network subnet that’s bound to Key Vault via Azure Private Link. This receives a private IP address. We’ll also need a private DNS zone. Without it, clients will resolve your vault’s public IP regardless of the private endpoint.
param virtualNetworkName string
param keyVaultName string
param subnetName string = 'snet-private-endpoints'

@description('Non-overlapping subnet CIDR within the existing virtual network.')
param subnetAddressPrefix string

resource virtualNetwork 'Microsoft.Network/virtualNetworks@2024-05-01' existing = {
  name: virtualNetworkName
}

resource subnet 'Microsoft.Network/virtualNetworks/subnets@2024-05-01' = {
  parent: virtualNetwork
  name: subnetName
  properties: {
    addressPrefix: subnetAddressPrefix
    privateEndpointNetworkPolicies: 'Disabled'
  }
}

resource keyVault 'Microsoft.KeyVault/vaults@2024-11-01' = {
  name: keyVaultName
  location: 'australiaeast'
  properties: {
    tenantId: tenant().tenantId
    sku: {
      family: 'A'
      name: 'standard'
    }
    enableSoftDelete: true
    softDeleteRetentionInDays: 90
    enablePurgeProtection: true
    enableRbacAuthorization: true
    publicNetworkAccess: 'Disabled'
    networkAcls: {
      bypass: 'None'
      defaultAction: 'Deny'
      ipRules: []
      virtualNetworkRules: []
    }
  }
}

resource privateEndpoint 'Microsoft.Network/privateEndpoints@2024-05-01' = {
  name: '${keyVault.name}-pe'
  location: virtualNetwork.location
  properties: {
    subnet: {
      id: subnet.id
    }
    privateLinkServiceConnections: [
      {
        name: '${keyVault.name}-connection'
        properties: {
          privateLinkServiceId: keyVault.id
          groupIds: [
            'vault'
          ]
        }
      }
    ]
  }
}

resource privateDnsZone 'Microsoft.Network/privateDnsZones@2020-06-01' = {
  name: 'privatelink.vaultcore.azure.net'
  location: 'global'
}

resource virtualNetworkLink 'Microsoft.Network/privateDnsZones/virtualNetworkLinks@2020-06-01' = {
  parent: privateDnsZone
  name: '${virtualNetwork.name}-link'
  location: 'global'
  properties: {
    registrationEnabled: false
    virtualNetwork: {
      id: virtualNetwork.id
    }
  }
}

resource privateDnsZoneGroup 'Microsoft.Network/privateEndpoints/privateDnsZoneGroups@2024-05-01' = {
  parent: privateEndpoint
  name: 'default'
  properties: {
    privateDnsZoneConfigs: [
      {
        name: 'key-vault'
        properties: {
          privateDnsZoneId: privateDnsZone.id
        }
      }
    ]
  }
}
Once this is configured, you can disable public network access on the vault, fully isolating it from the internet. If you need some Microsoft-managed services to reach the Key Vault (E.g. Azure Monitor), you can use Allow trusted Microsoft services to bypass this firewall exception rule.
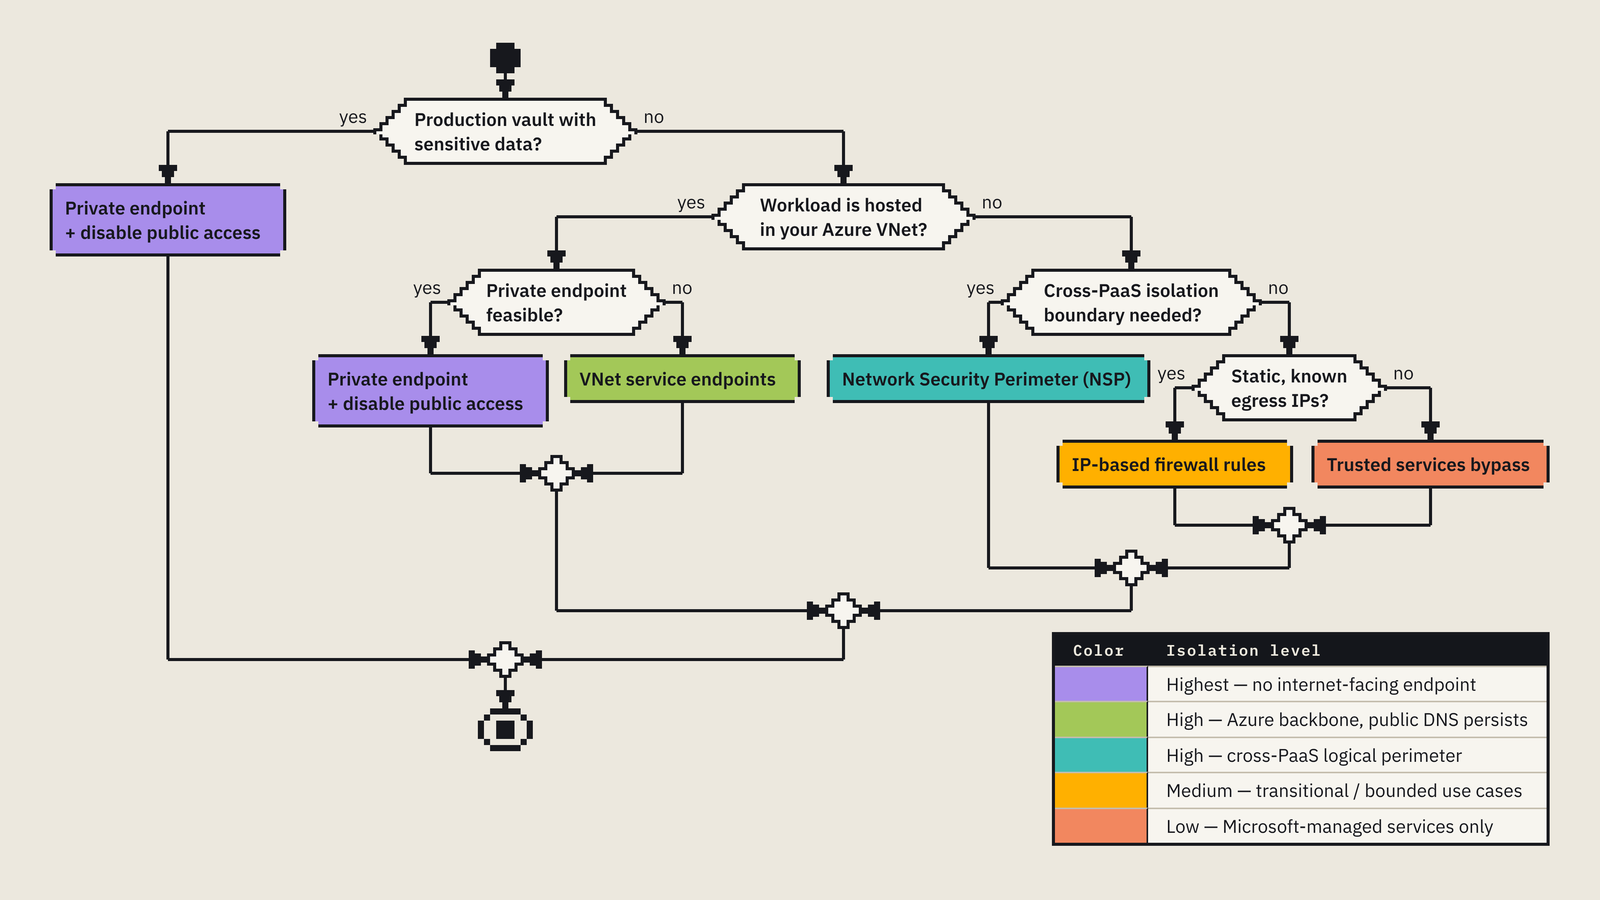
Not all vaults require the same level of network isolation. This diagram shows how you can match the model to the workload to keep the network configuration maintainable and appropriate for the risk:
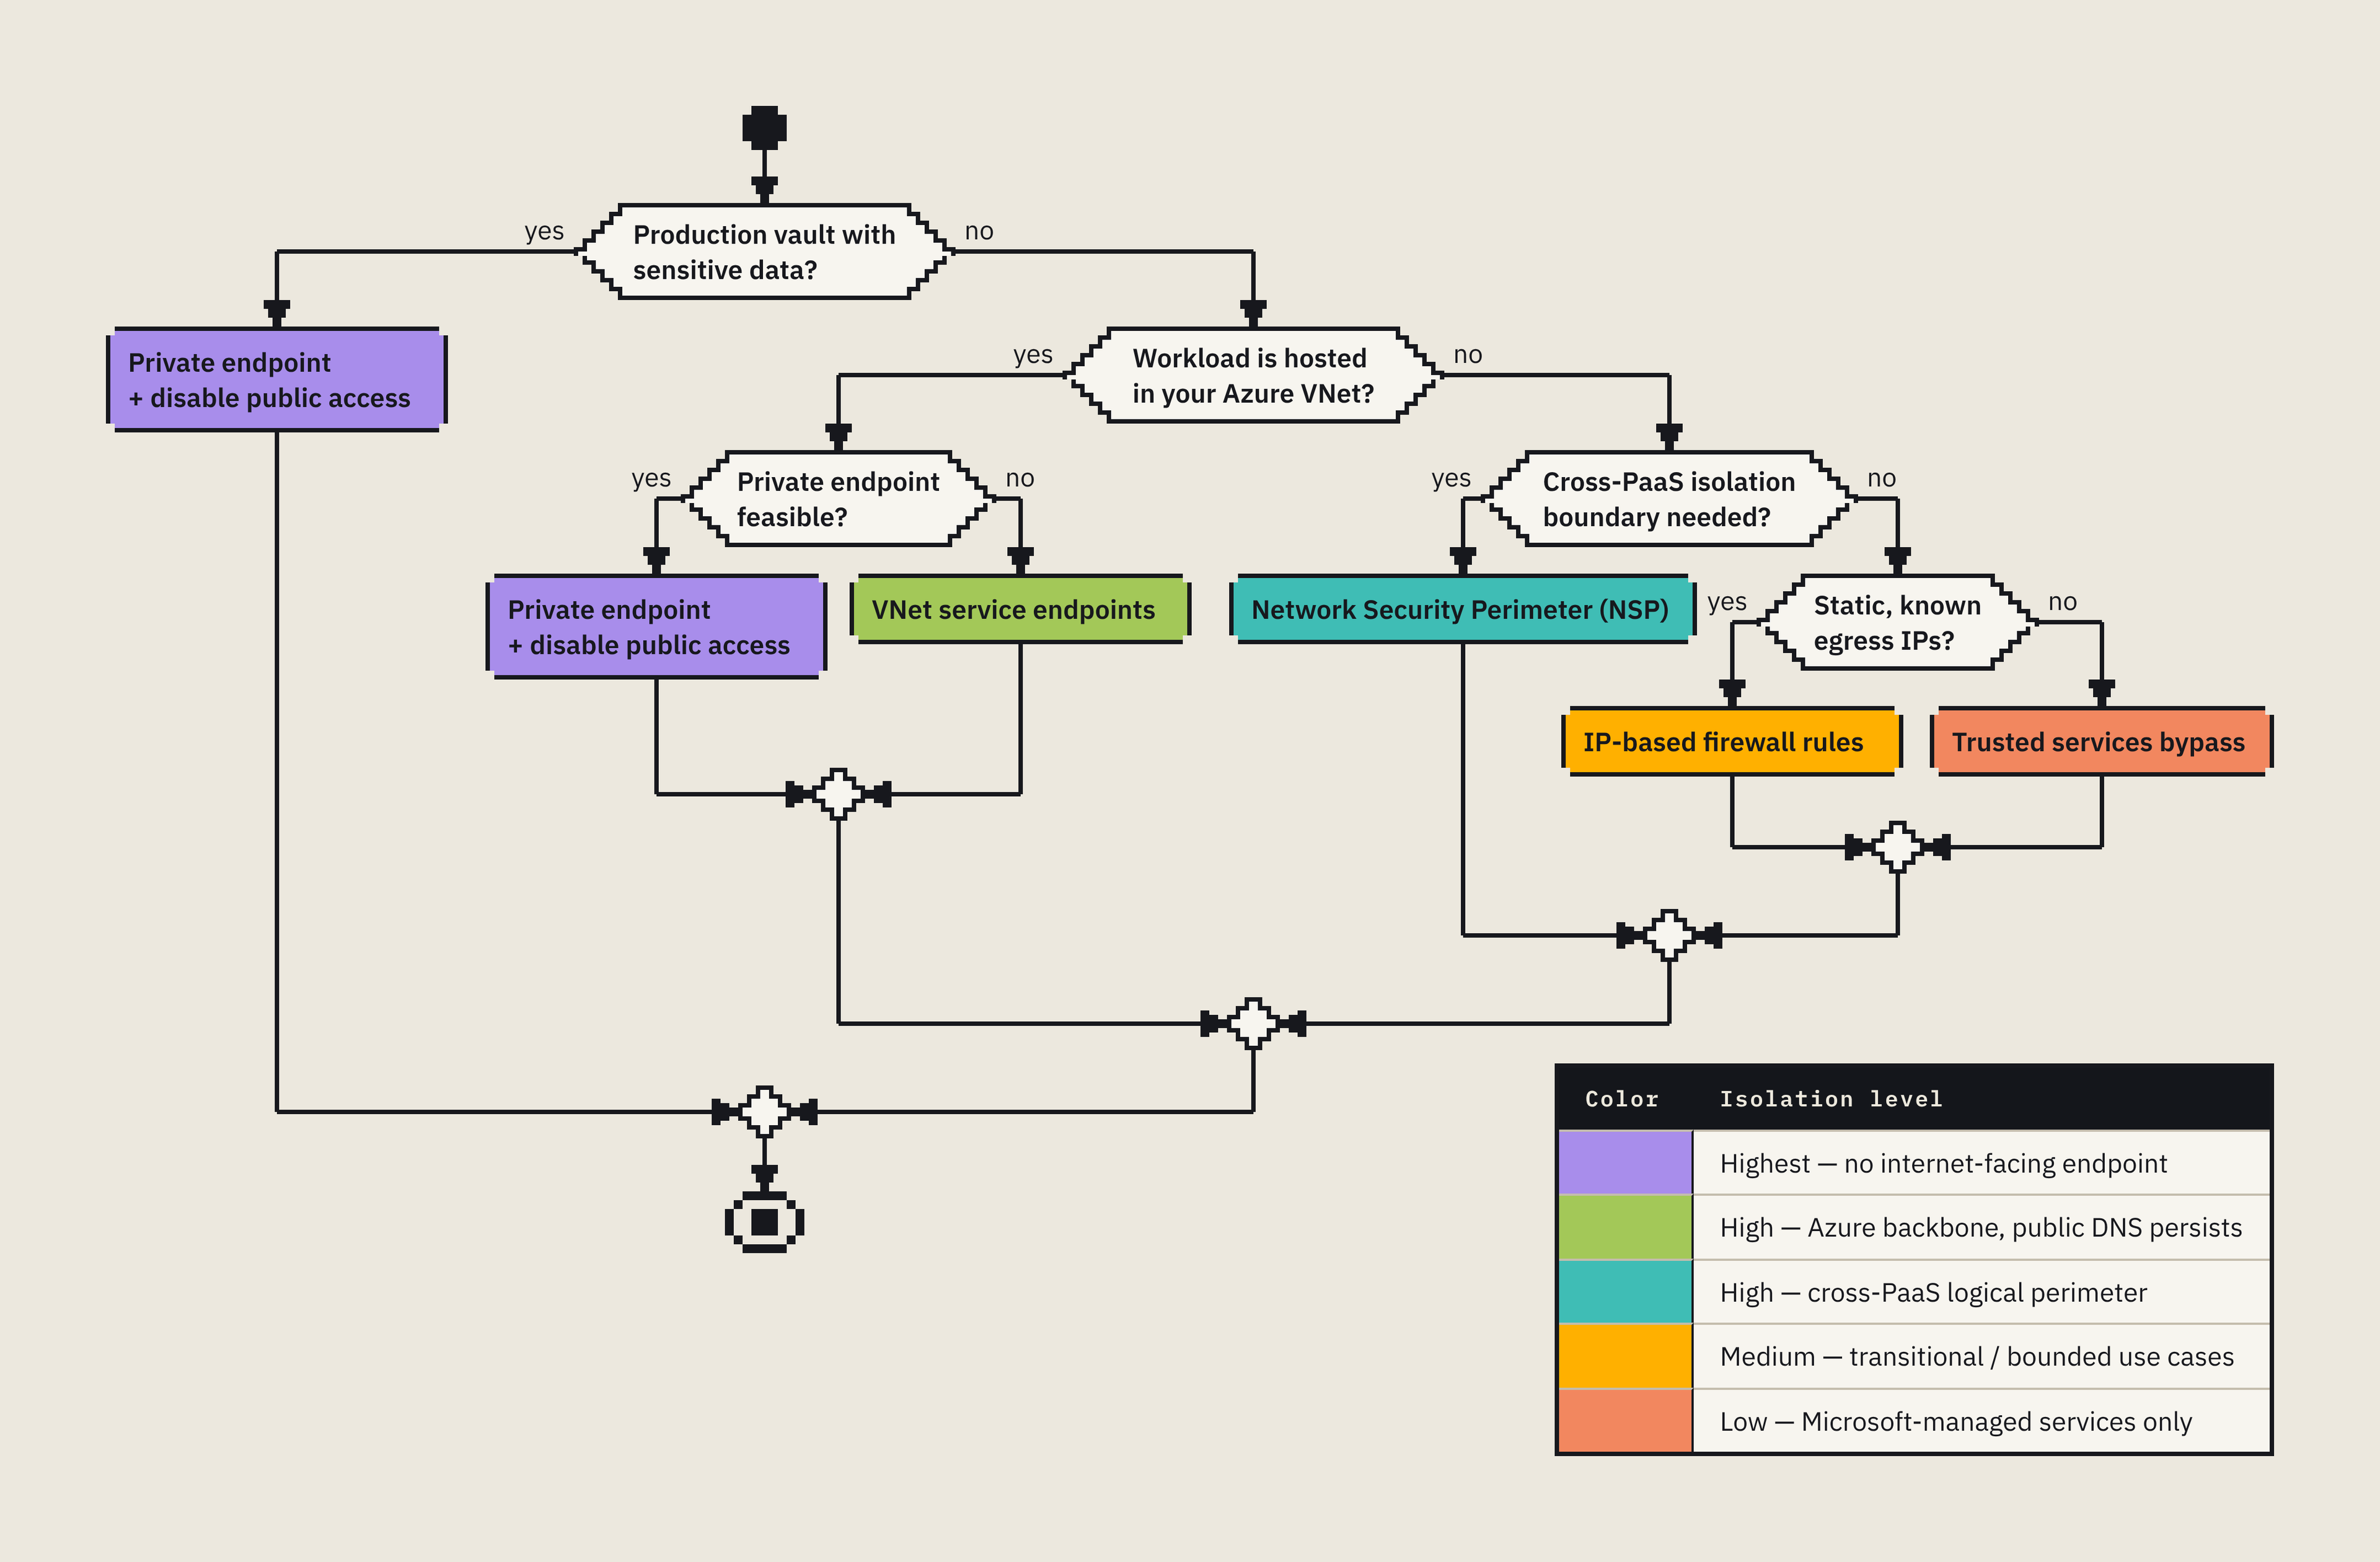
Choose network controls to match your workload’s access requirements and risk. The diagram recommends private endpoints with public access disabled for production vaults containing sensitive data.
Wrap up
Hopefully you now have a better understanding about how you can configure your Azure Key Vaults for enterprise scenarios. We discussed how security controls such as soft delete, purge protection, and SKU selection factor in to protect our Key Vaults and the objects inside our Key Vaults. We also took a look at how we can configure RBAC-based access controls to limit permissions on what identities can do to our Key Vault. Finally, we took at a look at how we can secure our Key Vaults via network controls such as firewall rules, service endpoints, and private endpoints.
If you have any questions, feel free to reach out to me on X @willvelida or on Bluesky
Until next time, Happy coding! 🤓🖥️