
Azure SQL is a managed, secure, cloud database that’s built on the Microsoft SQL Server engine. Using Azure SQL, you can host, manage, and scale relational databases on Azure without purchasing physical hardware.
In this blog post, we’ll cover the main security controls that we can apply to Azure SQL Database.
Configuring Managed Identity Access for Azure SQL
Using identity-based authentication eliminates the need for passwords, and prevents attacks like password sprawl. In Azure SQL, we can implement Microsoft Entra ID-only authentication to enforce authentication through Microsoft Entra only.
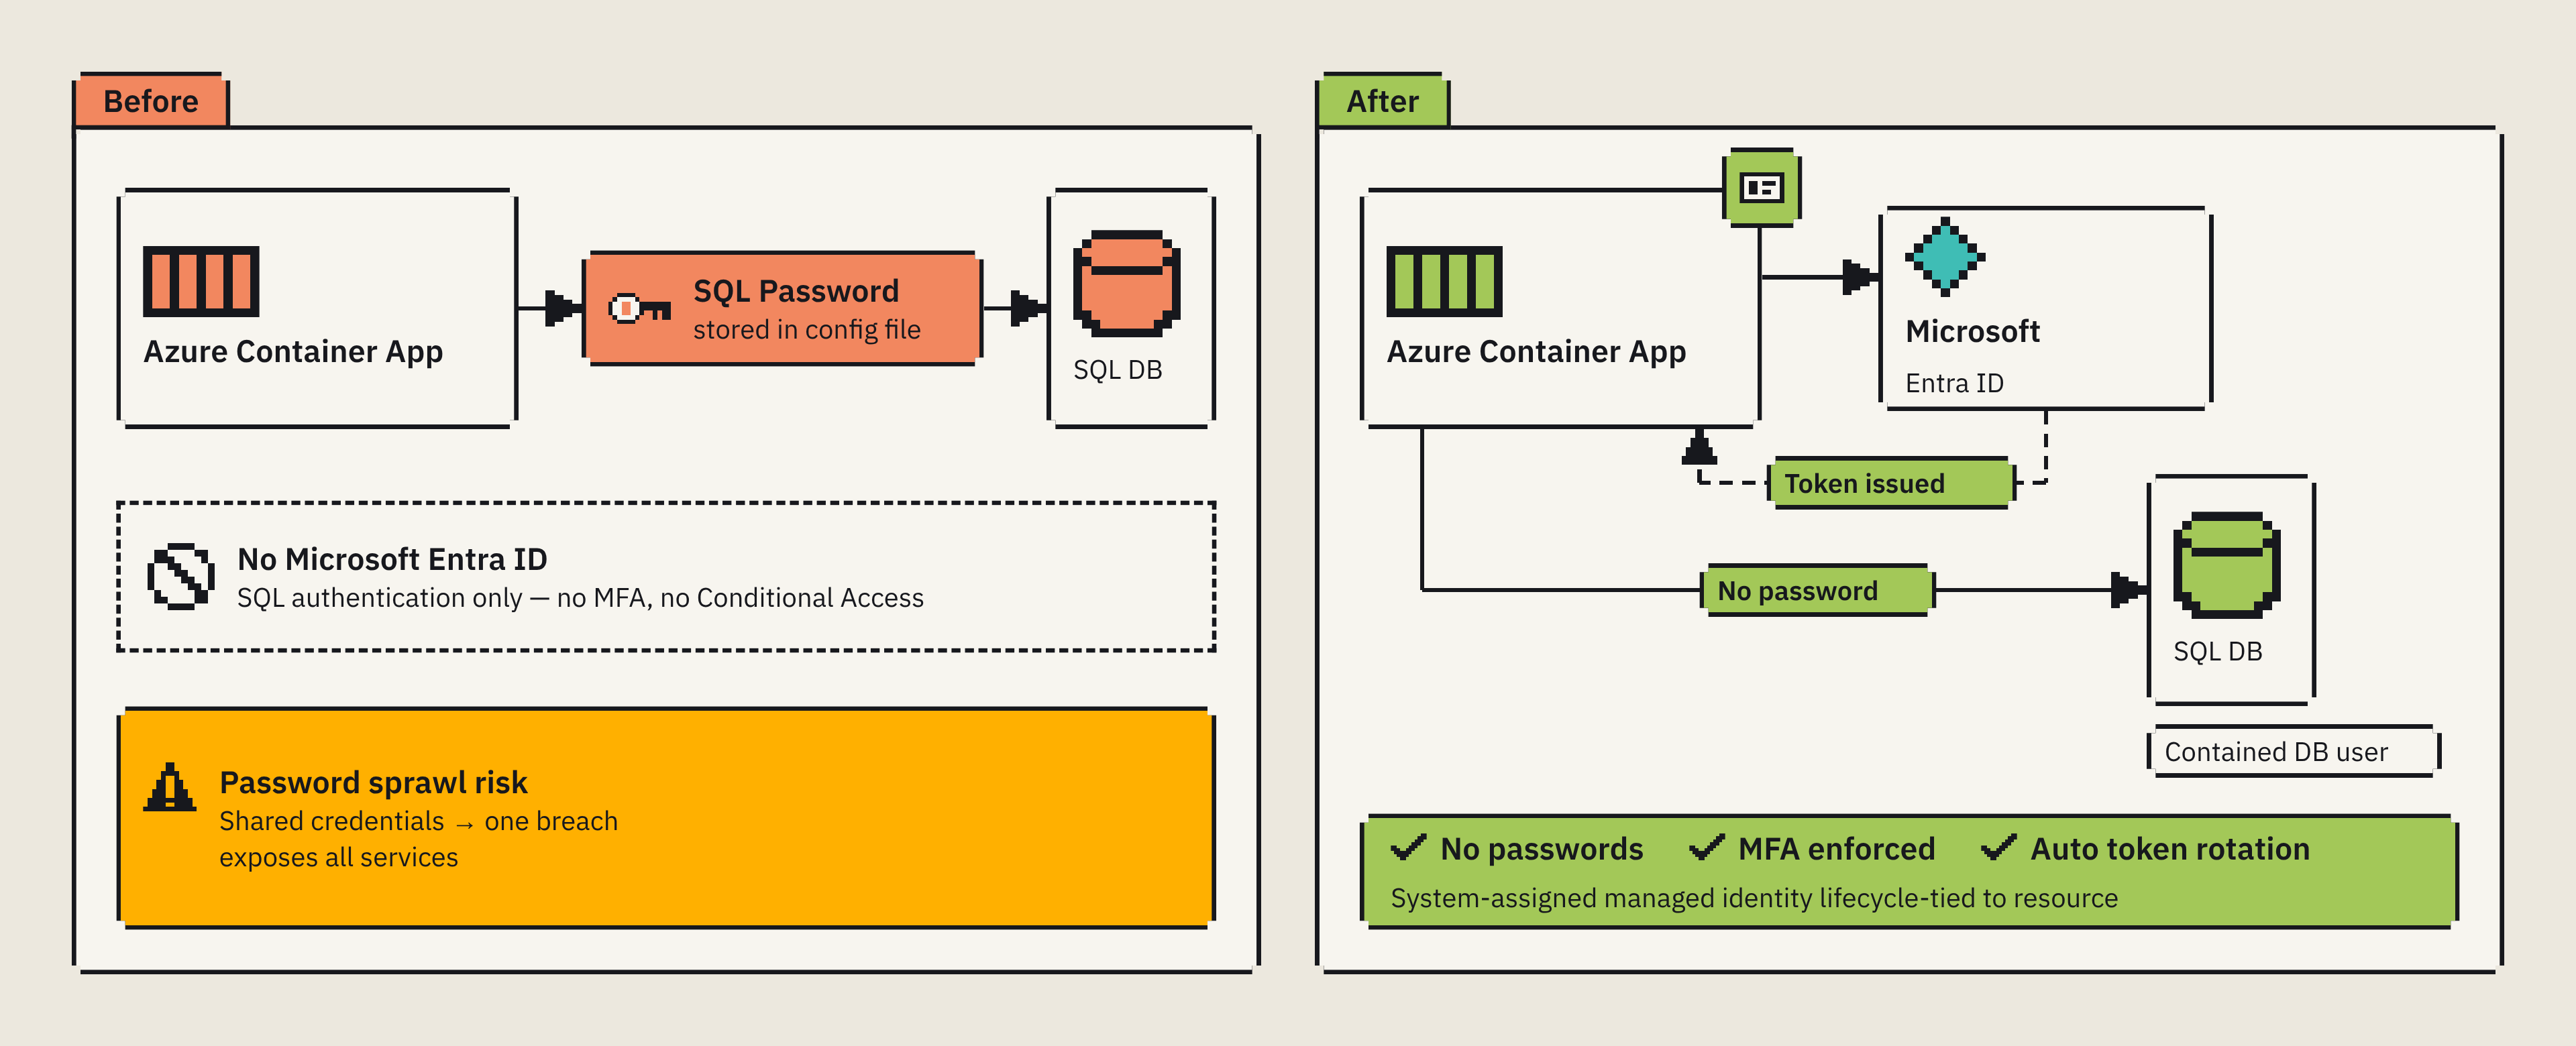
Set up Microsoft Entra ID-only authentication
Using Microsoft Entra ID-only authentication disables SQL logins and SQL Server authentication at the server level. Traditional username-password authentication stops working, and all connections must use Microsoft Entra credentials.
First, we need to set a Microsoft Entra admin on the logical SQL server or SQL Managed Instance. This admin has full control over the database and can create Entra users. We can set an admin to a user or group using the Azure CLI:
az sql server ad-admin create \
    --resource-group <resource-group-name> \
    --server-name <sql-server-name> \
    --display-name "SQL Administrators" \
    --object-id <group-object-id>
When assigning an admin, use an Entra group so you can assign members to the group without having to reconfigure the SQL server when people leave and enter your organization.
After the Entra admin is set, you can enable Entra-only authentication through the CLI like so:
az sql server ad-only-auth enable \
    --resource-group "<resource-group-name>" \
    --name "<sql-server-name>"
In order to do this, you need to have the SQL Security Manager Azure RBAC role. This role is designed for security engineers who can apply security controls to Azure SQL, but not need to read or modify the data.
You can verify that Entra-only authentication is enabled by running the following CLI command:
az sql server ad-only-auth get \
    --resource-group "<resource-group-name>" \
    --name "<sql-server-name>" \
    --query azureAdOnlyAuthentication \
    --output tsv
Once this is enabled, SQL authentication is prevented from connecting at the server level. Those logins and users still remain, but they can’t establish new connections.
Create contained database users for managed identities
Entra users and managed identities are added to databases as contained database users, not server logins.
Contained databased users exist within the database itself, and they authenticate directly against Entra ID.
Say if we use a managed identity for one of our Container Apps, when we want to grant that managed identity access, we can connect to the database as the Microsoft Entra admin and run the following T-SQL:
CREATE USER [ContainerAppName] FROM EXTERNAL PROVIDER;
ALTER ROLE db_datareader ADD MEMBER [ContainerAppName];
First, we create a container database user that’s mapped to the managed identity, with the name in brackets matching the name of the Azure resource with the managed identity (This must match! Otherwise it won’t work).
Then we grant read-only access by adding the user to the db_datareader role. For write access, we can use db_datawriter.
We can also create users for Microsoft Entra groups to simplify how we manage permissions for multiple users or services that need the same access:
CREATE USER [SecurityEngineers] FROM EXTERNAL PROVIDER;
GRANT VIEW DATABASE STATE TO [SecurityEngineers];
Applying Network Isolation controls
Private endpoints enable you to bring your Azure SQL Database into your virtual network address space and eliminate the need to have public endpoint access. When you deploy a private endpoint, Azure creates a network interface with a private IP address from your subnet and maps it to your SQL server’s FQDN.
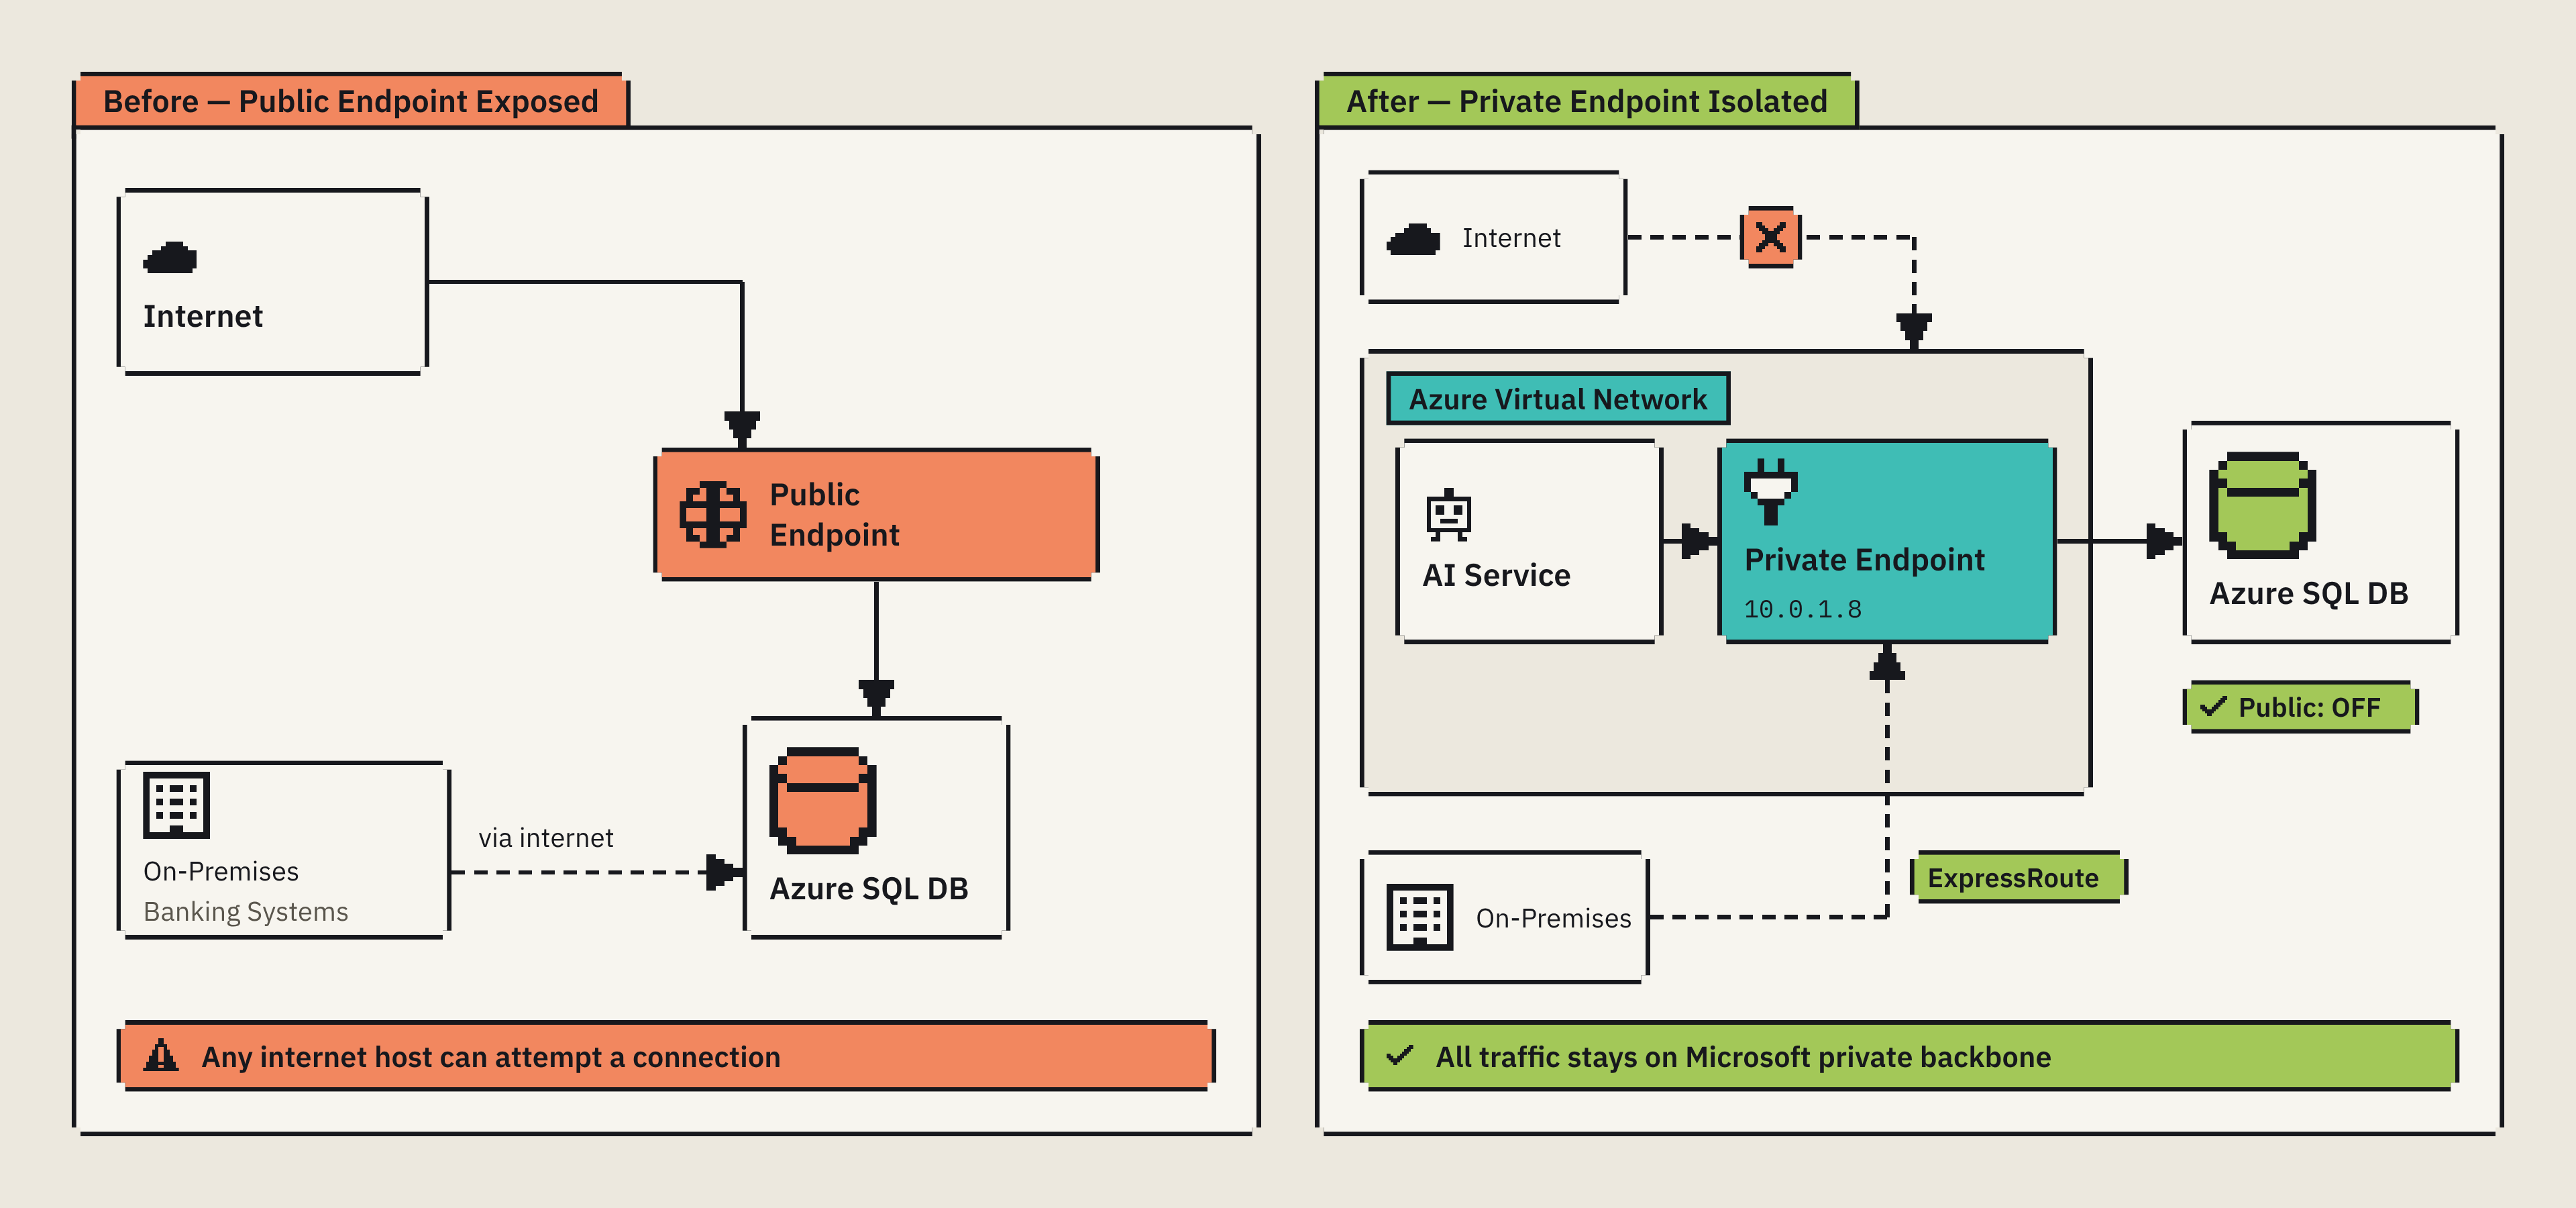
Let’s see how we can do this in Bicep:
param sqlServerName string
param virtualNetworkName string
param privateEndpointSubnetName string

resource sqlServer 'Microsoft.Sql/servers@2023-08-01' existing = {
  name: sqlServerName
}

resource vnet 'Microsoft.Network/virtualNetworks@2023-11-01' existing = {
  name: virtualNetworkName
}

resource subnet 'Microsoft.Network/virtualNetworks/subnets@2023-11-01' existing = {
  parent: vnet
  name: privateEndpointSubnetName
}

resource privateEndpoint 'Microsoft.Network/privateEndpoints@2023-11-01' = {
  name: '${sqlServerName}-pe'
  location: vnet.location
  properties: {
    subnet: {
      id: subnet.id
    }
    privateLinkServiceConnections: [
      {
        name: '${sqlServerName}-connection'
        properties: {
          privateLinkServiceId: sqlServer.id
          groupIds: [
            'sqlServer'
          ]
        }
      }
    ]
  }
}

resource privateDnsZone 'Microsoft.Network/privateDnsZones@2020-06-01' = {
  name: 'privatelink.database.windows.net'
  location: 'global'
}

resource dnsLink 'Microsoft.Network/privateDnsZones/virtualNetworkLinks@2020-06-01' = {
  parent: privateDnsZone
  name: '${virtualNetworkName}-link'
  location: 'global'
  properties: {
    registrationEnabled: false
    virtualNetwork: {
      id: vnet.id
    }
  }
}

resource dnsZoneGroup 'Microsoft.Network/privateEndpoints/privateDnsZoneGroups@2023-11-01' = {
  parent: privateEndpoint
  name: 'default'
  properties: {
    privateDnsZoneConfigs: [
      {
        name: 'sql'
        properties: {
          privateDnsZoneId: privateDnsZone.id
        }
      }
    ]
  }
}

output sqlServerHostname string = '${sqlServerName}.database.windows.net'
How this works:
groupIds: ['sqlServer']selects the SQL server Private Link subresource.- The private endpoint will receive a private IP address from the existing subnet.
- The DNS zone group manages the server’s private DNS record automatically.
- The VNET link makes the zone available to clinets using Azure-provided DNS in that VNET.
The connection policy determines how traffic flows after a private endpoint is deployed. The Proxy policy routes all traffic through port 1433 and is the simpliest option for private endpoint deployments.
The Redirect policy provides lower latency by establishing a direct connection to the database node, but needs clients to open ports 1433 to 65535 for both inbound and outbound communication on the VNet hosting the private endpoint.
Creating a private endpoint does not disable the SQL server’s public endpoint. We can add this as a property to the SQL Server resource in Bicep like this:
publicNetworkAccess: 'Disabled'
We can verify network connectivity from a Windows machine in the VNET, or a connected network with suitable DNS resolution:
Resolve-DnsName "<sql-server-name>.database.windows.net"

Test-NetConnection `
    -ComputerName "<sql-server-name>.database.windows.net" `
    -Port 1433
The hostname should resolve to the private endpoint’s private IP. Once that’s confirm, you can test an actual database connection using Entra authentication.
For SQL Managed Instance, deployments are already directly inside a virtual network from the start, and it doesn’t require a private endpoint.
When you allocate a dedicated subnet, you delegate it to the Microsoft.Sql/managedInstances. This delegation gives the SQL MI service permission to manage network resources in that subnet.
Encrypt and protect data in transit and at rest
Transparent Data Encryption (TDE) is enabled by default on all Azure SQL databases. While this approach provides a strong level of encryption without having the overhead, we can also control our own customer-managed keys.
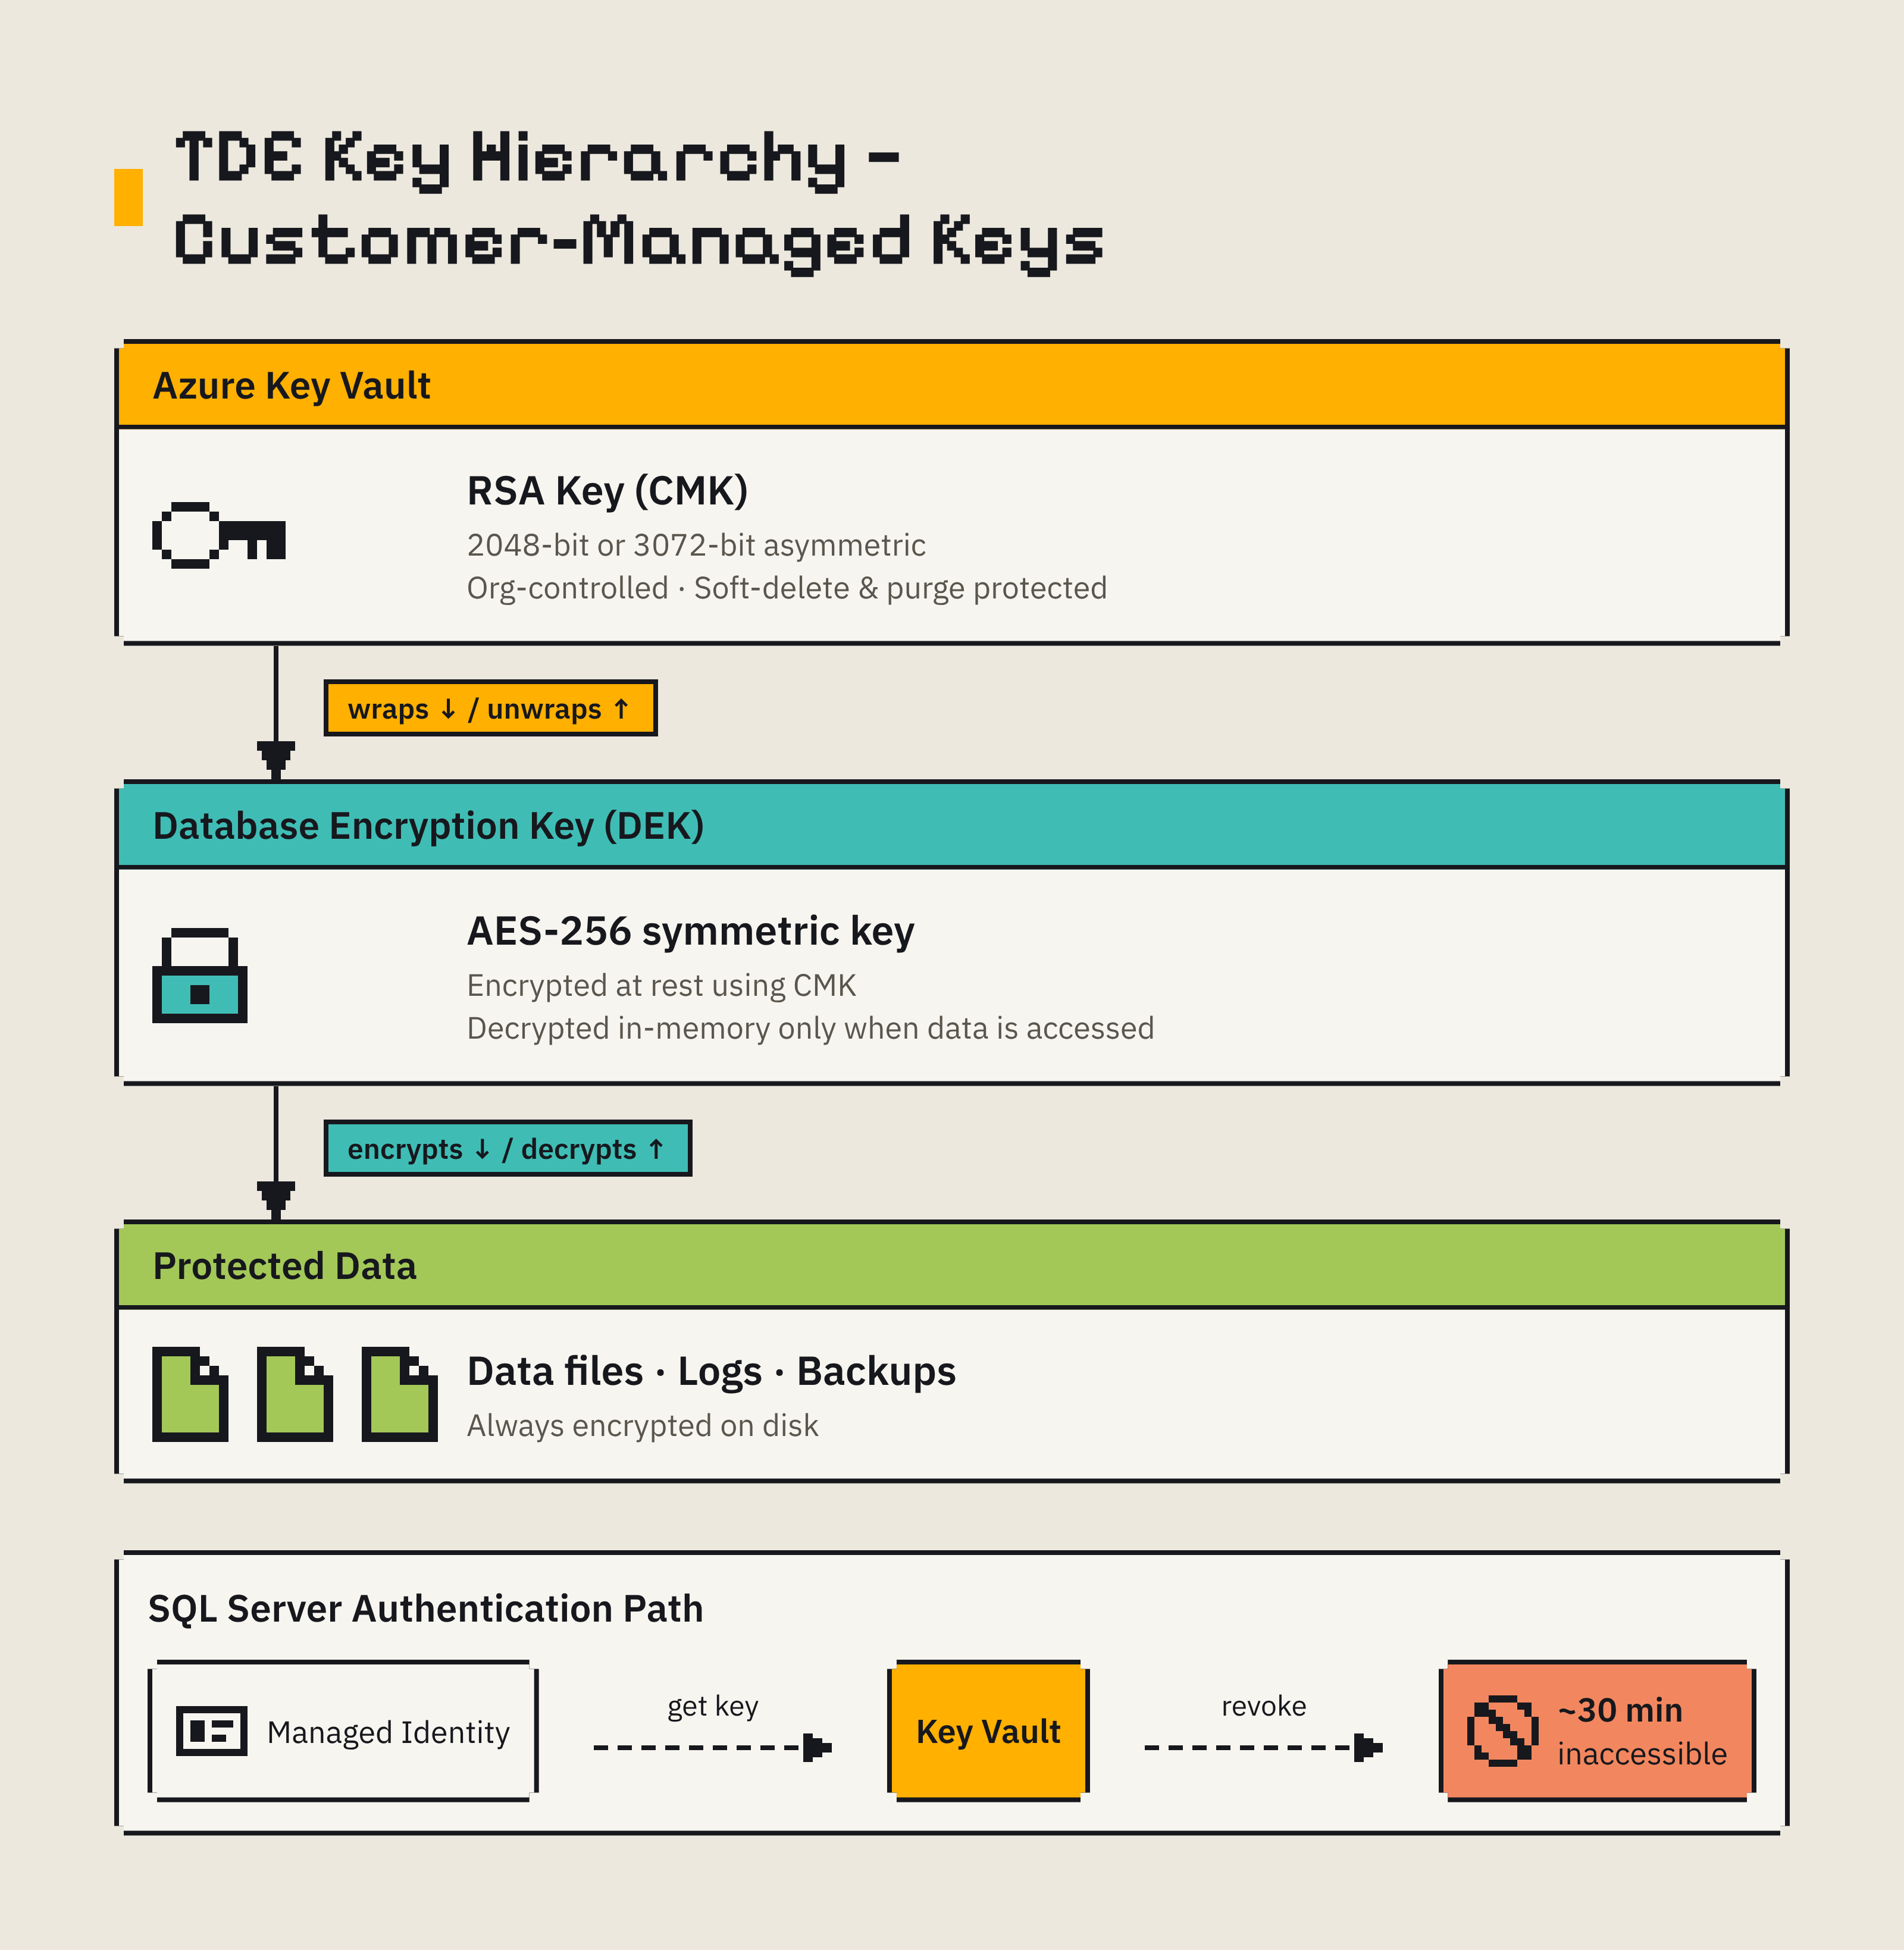
Customer-managed keys with Azure Key Vault
Customer-managed keys (CMK) give us control over the encryption keys that protect our database. SQL Server uses its managed identity to retrieve the key from Key Vault each time it needs to encrypt or decrypt data.
In order for CMKs to work for SQL Server, you must enable soft-delete on the Key Vault, and enable purge protection. If the Key Vault has a firewall configured, you must enable the Allow trusted Microsoft services to bypass the firewall setting, without it the managed identity can’t retrieve the TDE key.
This doesn’t apply if SQL server connects to Key Vault through a private endpoint
Store data in transit with TLS
Azure SQL requires TLS for all connections. Like Azure Storage, you can set the minimum TLS version to 1.2, and any clients using older protocols can’t connect. TLS 1.3 is also available for Azure SQL Database.
resource sqlServer 'Microsoft.Sql/servers@2023-08-01' = {
  name: sqlServerName
  location: location
  properties: {
    version: '12.0'
    minimalTlsVersion: '1.2'
    // Keep your existing administrator and networking properties here.
  }
}
The Tabular Data Stream (TDS) protocol carries SQL traffic over TLS. TDS 8.0 with Strict connection encryption proivdes the highest security by encrypting the entire connection handshake, including authentication credentials. We can configure this in the client connection string using a driver that supports TDS 8.0:
Server=tcp:<sql-server-name>.database.windows.net,1433;Database=<database-name>;Authentication=Active Directory Managed Identity;Encrypt=Strict;
Always Encrypted for column-level protection
Always Encrypted protects specific columns by encrypting data at the application layer before sending it to Azure SQL.
Always Encrypted ensures the database engine never sees plaintext values for encrypted columns, even during query exuection.
This is ideal for addressing insider threat scenarios where anyone with elevated SQL privileges must not access sensitive data.
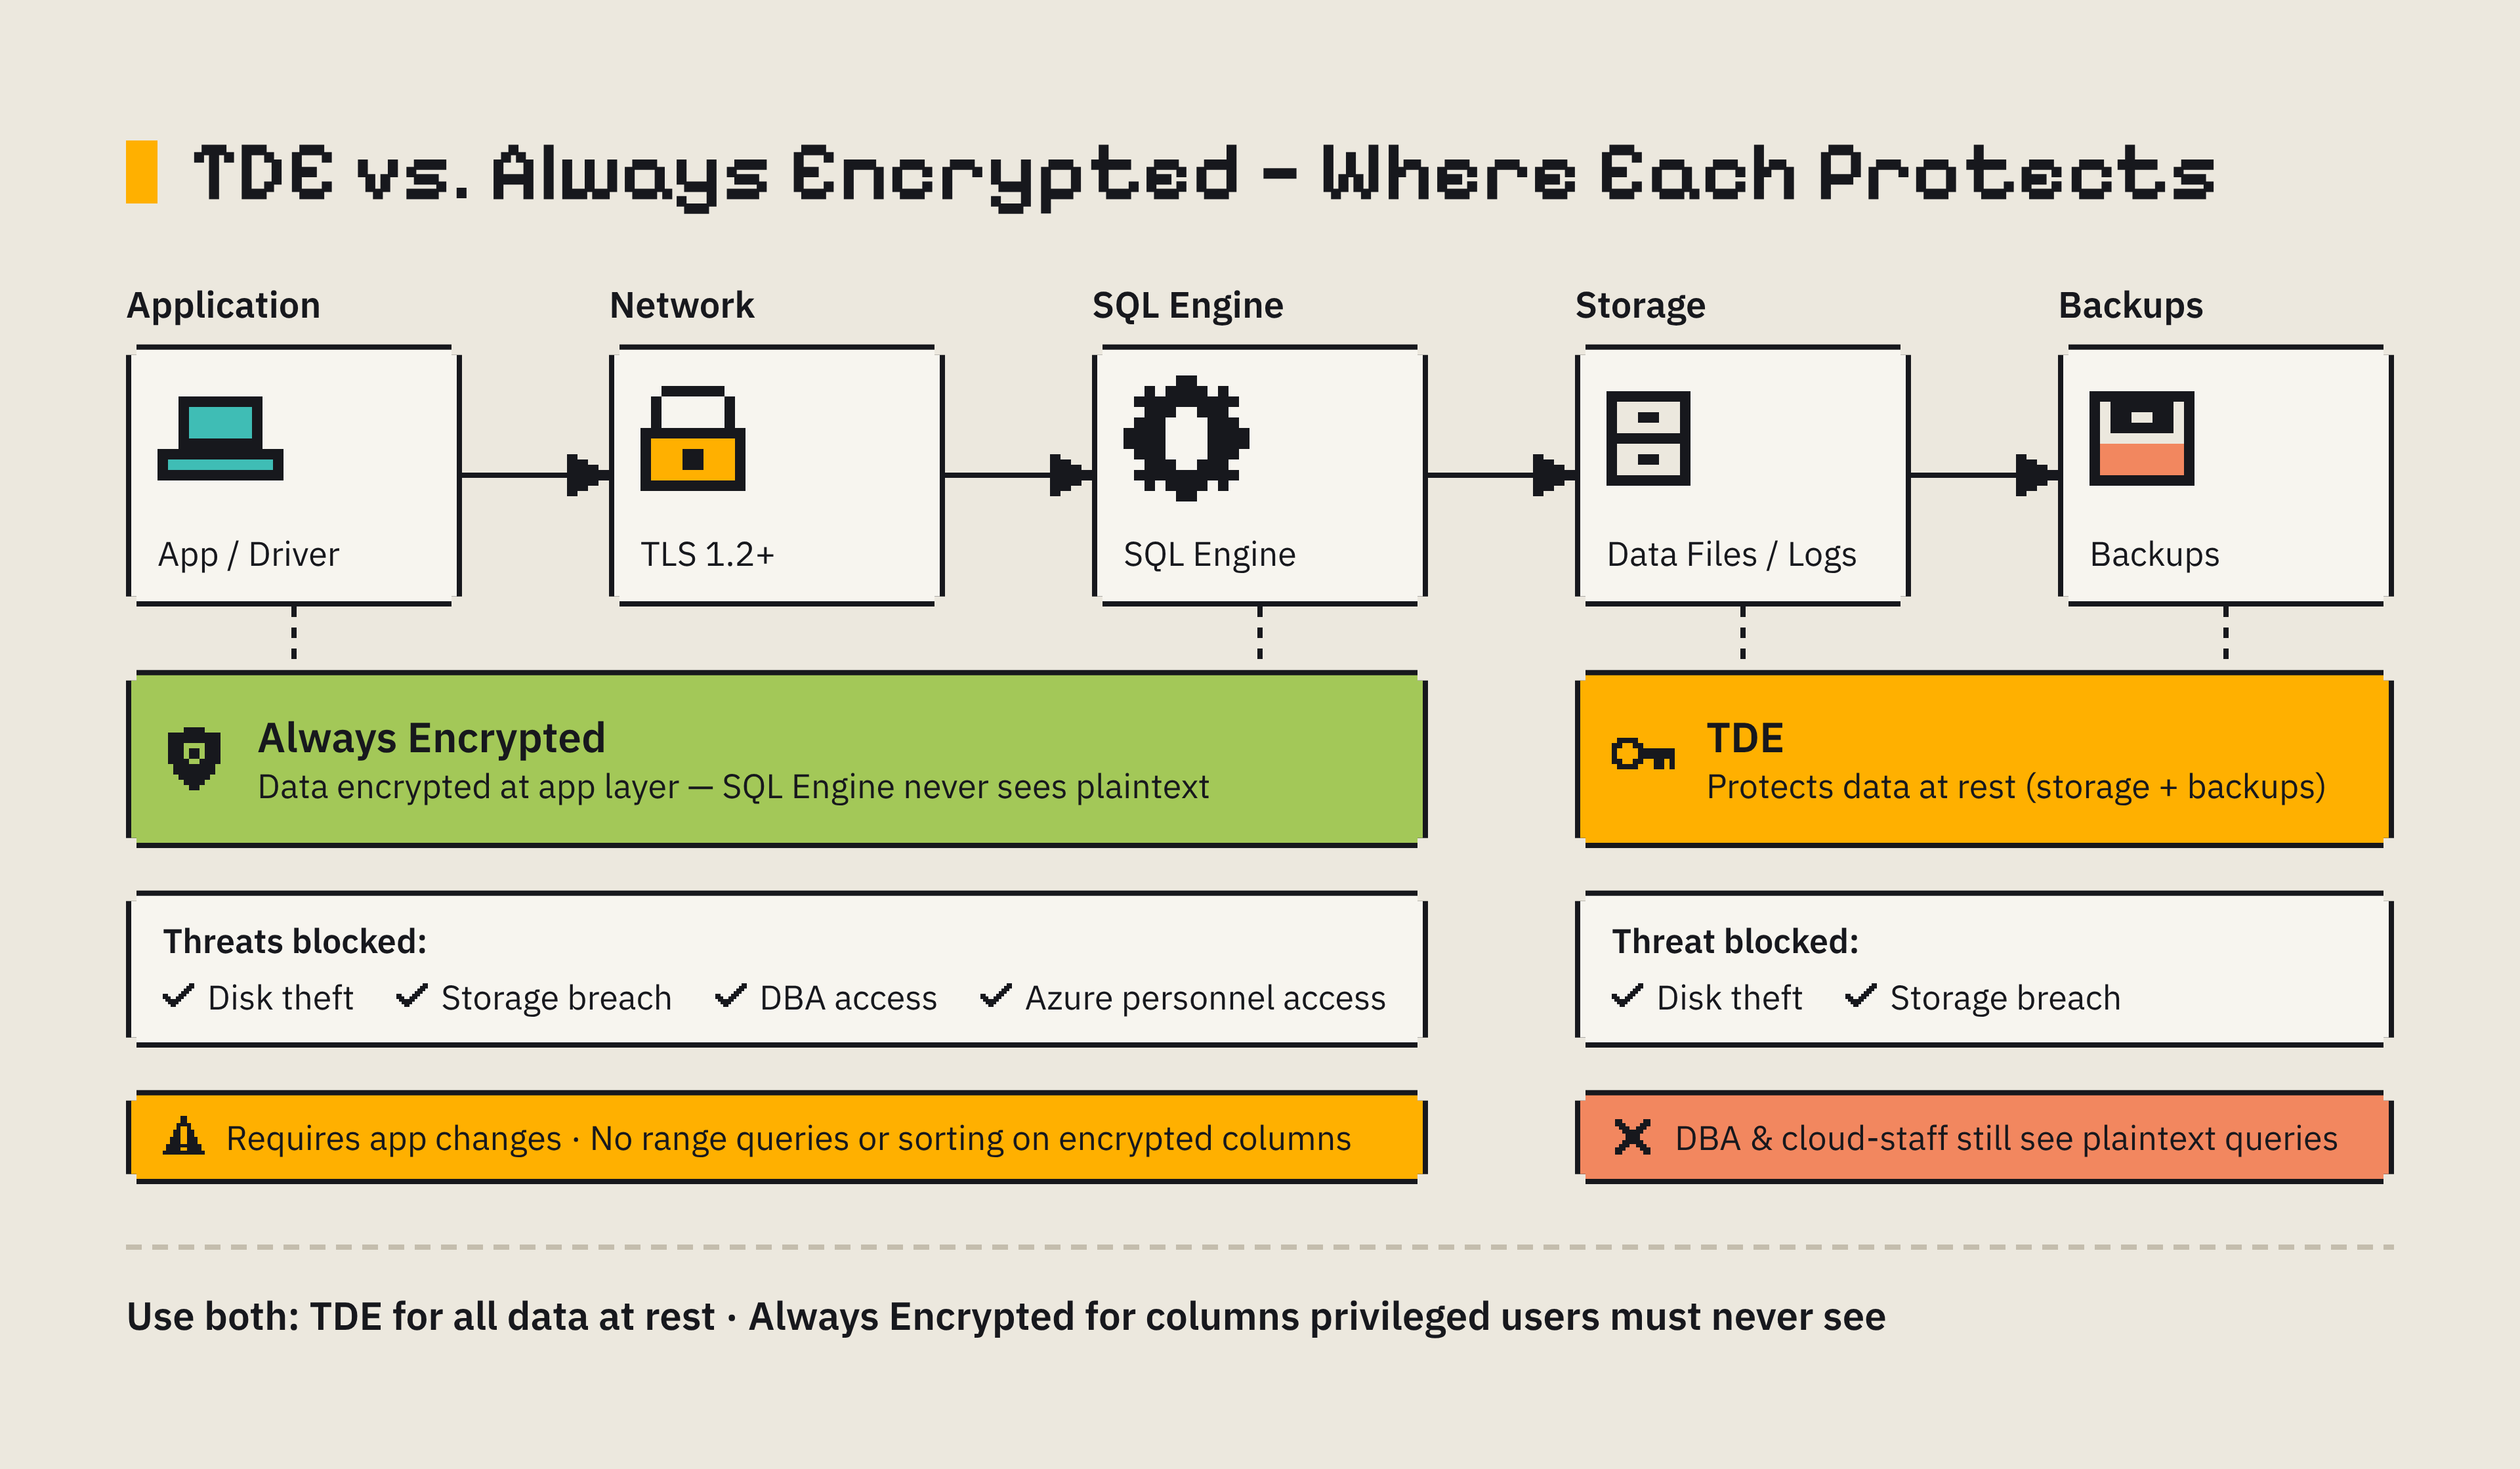
However, Always Encrypted requires application-layer changes to manage the column main key and column encryption key, and query capabilities are limited. It’s great for dealing with insider threats, but it’s not a replacement for TDE.
Conclusion
In this blog post, we learn how we can configure platform-level security layers for Azure SQL Database. We learnt how we can implement Microsoft Entra ID-only authentication and how to disable legacy SQL authentication to prevents threats like password sprawls.
We also learnt how we can isolate network access to our Azure SQL database through private endpoints and disabling public network access.
Finally, we learnt how we can configure Transparent Data Encryption with Customer-Managed keys in Azure Key Vault, enforce TLS for client connections, and how Always Encrypted can be used to protect sensitive data from privileged users.
If you have any questions, feel free to reach out to me on X @willvelida or on Bluesky
Until next time, Happy coding! 🤓🖥️