
Azure SQL triggers for Azure Functions came into public preview for C# Functions last month. When you enable Change Tracking on a table in Azure SQL Database, Managed Instance or SQL Server (yes, on-prem SQL Server), you can create a function that will be triggered every time a row is created, updated or deleted.
In this article, we’ll dive into the details of SQL Trigger Functions, how Change Tracking works and how we can configure our Functions to listen to SQL Change Tracking. We’ll finish off by discussing how we can monitor how our functions scale as more changes are being processed using the scale controller logs.
About SQL Trigger Functions
As I mentioned before, the Azure SQL trigger uses SQL change tracking functionality to monitor a SQL table for changes, and then triggers a Function when a row is created, updated or deleted in that table.
At the time of writing, this feature is in public preview. Currently, you are limited to C# Functions that are hosted on either Premium or Dedicated plans. Another limitation is that isolated worker process functions aren’t supported yet.
What is SQL Change Tracking?
SQL change tracking is a tracking mechanism that enables applications to query for changes to data in a database. Before SQL trigger functions, you’d have to implement a custom change tracking mechanism to poll for changes to a table or database.
Change Tracking is used to answer two questions: What rows have changed for a table, and has a row changed. We can use change tracking to find out that a row has changed and what the latest data of that row is.
Applications that have to synchronize data with SQL Server must be able to query for changes. With change tracking, you can use it for both one-way and two-way synchronizations.
For more details on SQL Change Tracking, read this article.
Enabling SQL Change Tracking on Azure SQL
Let’s use the following SQL query to create our table:
CREATE TABLE dbo.[Orders] (
    [Id] UNIQUEIDENTIFIER PRIMARY KEY,
    [ProductName] NVARCHAR(200) NOT NULL,
    [Price] DECIMAL(38,2) NOT NULL
)
Now that we have our table, we need to enable change tracking on the database, and then enable it on the table. I used Azure Data Studio to perform these steps, but you can also use VS Code or SQL Server Management Studio (SSMS).
For our database, we write the following:
ALTER DATABASE [Todo]
SET CHANGE_TRACKING = ON
(CHANGE_RETENTION = 2 DAYS, AUTO_CLEANUP = ON);
Here, the CHANGE_RETENTION option specifies the time perform for which our change tracking information will be kept. It’s important to tune this correctly for your Function requirements. In the above query, I’ve set it to 2 days. However, if my Function is turned off for several days, it will only be able to catch the changes that occurred in the past two days.
The AUTO_CLEANUP option is used to enable or disable the clean-up task that removes old change tracking information. If you have a problem that causes issues for your trigger, turning off auto cleanup can be useful to prevent information older than the retention period being removed until that problem is resolved.
For the table, we write the following:
ALTER TABLE [dbo].[orders]
ENABLE CHANGE_TRACKING;
The trigger will need to have read access on the table to monitor for changes and so that the trigger can access the change tracking system tables.
Under the hood, each SQL trigger will have an associated change tracking and lease table in a schema az_func that’s created by the trigger if the tables don’t exist. These tables are used to track the current state of the trigger, allowing state to be persisted across sessions and for multiple instances of a trigger binding to be executed in parallel.
Currently, Azure AD authentication isn’t supported in SQL triggers, so we use the admin connection string to connect the function to change tracking.
Why is this important? The login that we use for the trigger must have permissions to create these tables and schema. The trigger will not work otherwise. If you delete or modify the tables, then your Functions might act a little funny. To reset the state of the triggers, you’ll need to stop all running functions with trigger bindings and then either truncate or delete the tables. When you start up the trigger function again, it will create the tables as necessary.
When Azure AD is finally supported for SQL triggers, ensure that the MSI has the sufficient levels of permissions to create these tables.
For more information on these internal state tables, please read the following article.
Writing our SQL Trigger Function
To use SQL triggers in our Functions, we’ll need to install the following NuGet package:
dotnet add package Microsoft.Azure.WebJobs.Extensions.Sql --version 1.0.44-preview
Once that’s installed, we can write our function like so:
[FunctionName("ReadOrders")]
public static void Run(
[SqlTrigger("[dbo].[orders]", ConnectionStringSetting = "SqlConnectionString")] IReadOnlyList<SqlChange<Order>> changes, ILogger logger)
{
    foreach (var change in changes)
    {
        Order order = change.Item;
        logger.LogInformation($"Change operation: {change.Operation}");
        logger.LogInformation($"Id: {order.Id}, Product Name: {order.ProductName}, Price: {order.Price}");
    }
}
In this function, we configure our trigger using the following attributes:
| Attributes | What does this do? |
|---|---|
| TableName | The name of the table being monitored by the trigger |
| ConnectionStringSetting | The connection string for the database containing the table being monitored for changes |
The SQL trigger binds to a IReadOnlyList<SqlChange<T>>, which is a list of SqlChange objects with 2 properties:
- Item. This is the item that was changed. This type of item should follow the table schema.
- Operation. This is the operation that was performed on the monitored table. The values supported are Insert, Update and Delete.
For reference, here’s our Order object that matches our schema defined in [dbo].[orders] table:
public class Order
{
    public Guid Id { get; set; }
    public string ProductName { get; set; }
    public decimal Price { get; set; }
}
When changes are picked up by the change tracking mechanism, we bind them to our list. We can then iterate over that list to perform actions downstream. This function is super simple, I’m just getting the Order object from the Item property, logging out the operation that was performed on it, and then logging out the values of my Order.
Our logs should look like this:
[2022-12-15T20:25:42.951Z] Change operation: Insert
[2022-12-15T20:25:42.952Z] Id: deaa1643-00a4-4d99-810e-e00aca361835, Product Name: Generic Steel Chicken, Price: 2.00
In addition to connecting our Function to Azure SQL, we can configure the following settings for our trigger:
| App Setting | What does this do? |
|---|---|
| Sql_Trigger_BatchSize | This controls the number of changes processed at once before being sent to the triggered function. |
| Sql_Trigger_PollingIntervalMs | This controls the delay in milliseconds between processing each batch of changes. |
| Sql_Trigger_MaxChangesPerWorker | This controls the upper limit of the number of pending changes in the user table that are allowed per app worker. If the changes count exceeds this limit, it will result in a scale out. Only applies with Function apps that have runtime driven scaling enabled. |
Runtime-driven scaling
If you’re on Premium plan functions, enable runtime-driven scaling to allow your functions to scale properly when using SQL triggers.
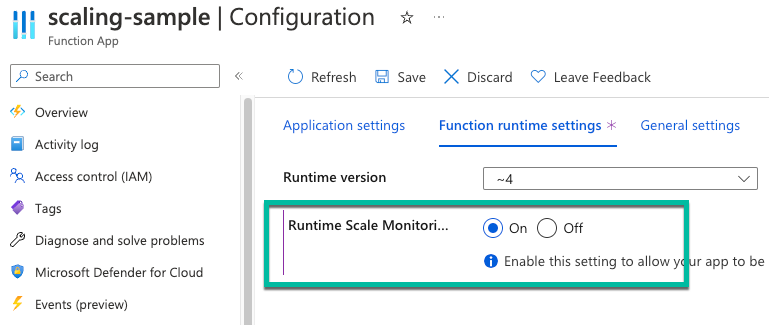
To do this, head into your Function App, choose Configuration and on the Function runtime settings tab, turn on Runtime scale monitoring.
Monitoring our Functions
With runtime-driven scaling enabled, you can emit scale controller logs to either App Insights or Blob storage, so you can understand how the scale controller is controlling scale within your Function.
To enable this, you need to add a setting called SCALE_CONTROLLER_LOGGING_ENABLED, and provide it a value in the format of <DESTINATION>:<VERBOSITY>. DESTINATION is where we send our logs to (either AppInsights or Blob) andVERBOSITY is the level of logging (None, Warning or Verbose).
Once scale controller logs are sent to App Insights, we can query them like so:
traces
| extend CustomDimensions = todynamic(tostring(customDimensions))
| where CustomDimensions.Category == "ScaleControllerLogs"
Which will produce the following results:

We can extend these logs to include a specific event, like so:
traces
| extend CustomDimensions = todynamic(tostring(customDimensions))
| where CustomDimensions.Category == "ScaleControllerLogs"
| where message == "Instance count changed"
| extend Reason = CustomDimensions.Reason
| extend PreviousInstanceCount = CustomDimensions.PreviousInstanceCount
| extend NewInstanceCount = CustomDimensions.CurrentInstanceCount
This query will show us how many instances the scale controller increased the Function App by, along with an associated reason why it scaled.

Using these logs, we can configure our Sql_Trigger_MaxChangesPerWorker to the appropriate count to ensure that our function app scales correctly according to the incoming changes the Function picks up from SQL Change Tracking.
For more on querying scale controller logs in Azure Functions, read the following article.
Conclusion
I’ve had a couple of customers ask me about using SQL Triggers in Azure Functions for a while, so I’m really excited about this feature and seeing how people will use it!
Hopefully by the time it becomes generally available, Azure AD authentication for the trigger will be in place. Support for more languages would be great to!
If you want to read more about Azure SQL triggers in Azure Functions, please read the following articles:
- Azure SQL trigger for Functions (preview)
- Azure SQL binding for Azure Functions GitHub documentation
If you have any questions about this article, or have any feedback about SQL triggers in Azure Functions, feel free to reach out to me on twitter @willvelida
Until next time, Happy coding! 🤓🖥️