
I returned from my honeymoon this week and while I was hoping for a quiet week to get over the jetlag, I found myself in the deep end of getting a legacy application that I had ported from .NET Framework 4.8.2 (they’re still out there) to .NET 8 and getting it to run in a Dev Container for a client that my team is currently working with.
In order to avoid paying for Docker licences, companies like my client have turned to alternatives like Podman to develop on containers.
It’s been a while since I’ve used Podman, so it was a good opportunity to get reacquainted with it and also share what I learned while trying to fight jetlag.
Installing and running Podman
Since I’m on a Windows machine, this tutorial will focus on how to install Podman on Windows and running it on Windows. For Linux and macOS users, check the docs. FYI this is also an ARM device.
There are a couple of prerequisites that you’ll need before installing Podman:
- Podman uses WSLv2 or Hyper-V, so you’ll need to be on Windows 11 to use it as of version 6.
- Both WSL and Hyper-V use virtualization, so make sure that your system supports and has hardware virtualization enabled. If you’re running Windows on a VM, ensure that nested virtualization is also supported. (I was doing this on a Dev Box that the client provisioned for me, so I was sorted. Azure Virtual Desktop, or AVD, does support nested virtualization as well).
I use the Windows Terminal for all my CLI work, so if you want to install that just run the following:
winget install Microsoft.Terminal
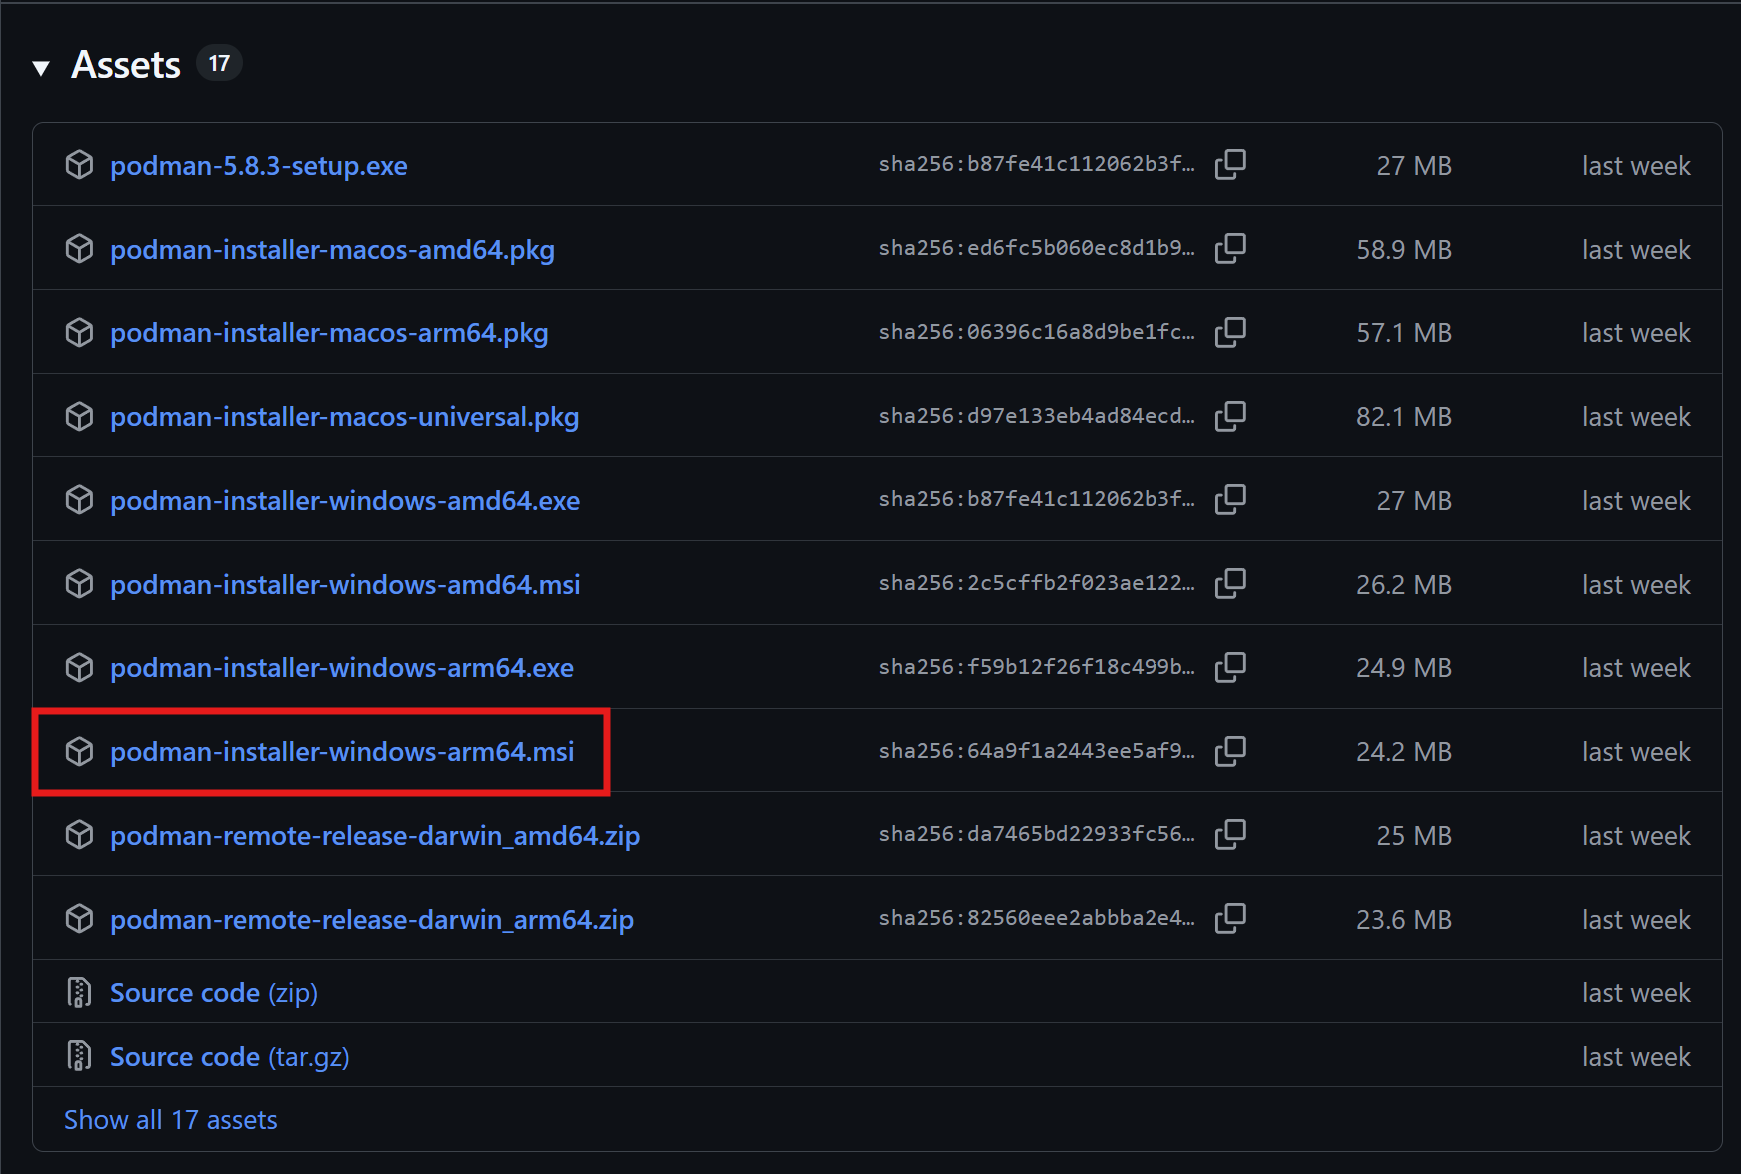
Next, grab the Podman Windows installer from Podman’s GitHub release page. I’m running on a ARM64, so I’ll be installing the podman-installer-windows-arm64.msi package from GitHub. Choose a package that fits your system configuration.
During the installation, you’ll be asked to choose either WSLv2 or Hyper-V for your virtualization provider. I use WSLv2, so that’s the one I used. Once you’ve made a choice, the Podman CLI will be installed and you can initialize a machine for it.
Before you do that, you should also install Podman Desktop. It’s an alternative to Docker Desktop, and provides a UI for you to manage your containers. Unlike Docker, you’ll need to install the CLI and the UI separately.
With Podman Desktop, you can manage containers and images through the GUI, create and manage Podman machines, add extensions, and it integrated with local and remote Kubernetes clusters.
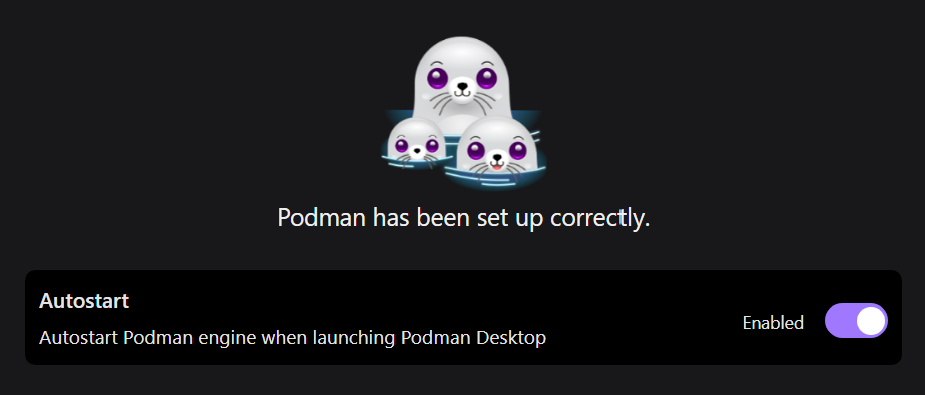
You can also enable a setting that autostarts the Podman engine when you launch Podman Desktop. If you haven’t created one yet, the UI will create one for you (we’ll do this using the CLI, so feel free to skip it for now)
To create a machine for Podman, we can run the following Podman CLI command:
podman machine init
This will pull a custom Fedora OCI image (or Fedora CoreOS when using Hyper-V) as an OCI artifact from quay.io/podman/machine-os which is an image designed to run Podman.
You do also have the option to specify which virtualization provider you want to use when initializing a machine:
# WSLv2
podman machine init --provider wsl
# Hyper-V
podman machine init --provider hyperv
You should see the following output on a successful install:
$ podman machine init
Looking up Podman Machine image at quay.io/podman/machine-os:5.8 to create VM
Getting image source signatures
Copying blob c7f06fb0f91d done   |
Copying config 44136fa355 done   |
Writing manifest to image destination
c7f06fb0f91d5c5bb893594872c81a27e4b48c14b88bb0df466689de3f79b1e5
Extracting compressed file: podman-machine-default-arm64: done
Importing operating system into WSL (this may take a few minutes on a new WSL install)...
The operation completed successfully.
Configuring system...
Machine init complete
To start your machine run:

        podman machine start
As you probably gathered from the output, we can start and stop our machine as we like. To start it up, run the following:
podman machine start
This produces the following output:
$ podman machine start
Starting machine "podman-machine-default"

This machine is currently configured in rootless mode. If your containers
require root permissions (e.g. ports < 1024), or if you run into compatibility
issues with non-podman clients, you can switch using the following command:

        podman machine set --rootful

API forwarding listening on: npipe:////./pipe/podman-machine-default

Another process was listening on the default Docker API pipe address.
You can still connect Docker API clients by setting DOCKER HOST using the
following powershell command in your terminal session:

        $Env:DOCKER_HOST = 'npipe:////./pipe/podman-machine-default'

Or in a classic CMD prompt:

        set DOCKER_HOST=npipe:////./pipe/podman-machine-default

Alternatively, terminate the other process and restart podman machine.
Machine "podman-machine-default" started successfully
Look at the output and note the comment about rootless mode. One difference between Podman and Docker is that Docker daemon runs as root by default, while Podman is daemonless and rootless by default.
To run a Podman machine as root, we need to run the following:
# If you ran the above first, you'll need to stop the machine, then set rootful
podman machine stop
# set the machine to rootful
podman machine set --rootful
# to restore rootless execution, you need to stop, then set rootful to false
podman machine stop
podman machine set --rootful=false
Why did I use rootful mode for Dev Containers? For my client work, I was working with bind mounts, file permissions, package installs and installing tools on postCreateCommand (more on this later).
It was just easier to run Dev Containers as root just to make things smooth.
Using Podman for Dev Containers in VS Code
With Podman up and running, let’s use it to run Dev Containers in VS Code. To use Dev Containers in VS Code, you’ll need the VS Code extension.
This extension lets you use a Podman container as your development environment. This helps you develop with a consistent toolchain that can be reproduced easily, and help your teammates get started with development in a consistent environment.
By default, it uses Docker. So to change it to Podman, you can open your VS Code setting using Ctrl + , shortcut and set the following setting in your settings.json file:
{
    "dev.containers.dockerPath": "podman",
    "dev.containers.dockerComposePath": "podman-compose"
}
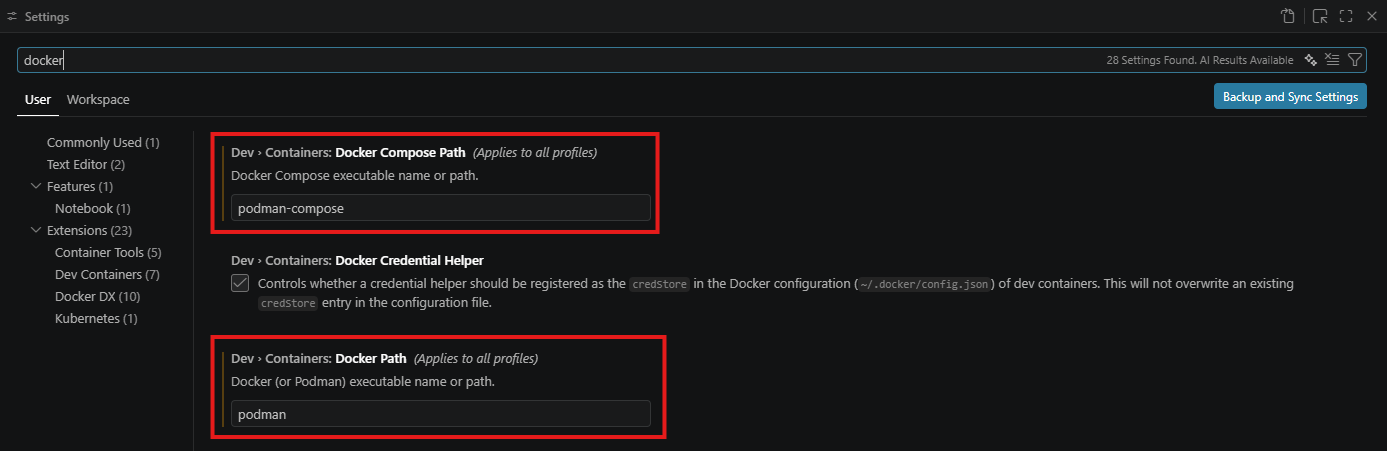
Alternatively, you can use the UI for your VS Code settings and set the Docker Path for Dev Containers to Podman like so:
That’s pretty much it in terms of configuring Podman. To see this in action, I have a very basic ASP.NET Web API running .NET 10 using a SQL Server container for the DB. So in my devcontainer.json file, I have the following:
{
  "name": "FoodApi (.NET 10 + SQL Server)",
  "dockerComposeFile": "docker-compose.yml",
  "service": "app",
  "workspaceFolder": "/workspace",
  "forwardPorts": [5028],
  "portsAttributes": {
    "5028": {
      "label": "FoodApi (HTTP)",
      "onAutoForward": "notify"
    }
  },
  "customizations": {
    "vscode": {
      "extensions": [
        "ms-dotnettools.csharp",
        "ms-mssql.mssql"
      ]
    }
  },
  "postCreateCommand": "dotnet restore",
  "remoteUser": "vscode"
}
One limitation which Podman Dev Containers is that features don’t work! We need to install tools directly in our Dockerfile instead. features work in Docker’s buildx builder, but they fail in buildah (Podman’s builder).
Podman also has a compose feature similar to Docker compose. It reads the same docker-compose.yml format, so we don’t need to do any modification to make it Podman friendly.
name: food-api

services:
  app:
    build:
      context: .
      dockerfile: Dockerfile
    volumes:
      - ..:/workspace:cached
    # Keep the container running so VS Code can attach and you can run the app on demand.
    command: sleep infinity
    environment:
      ASPNETCORE_ENVIRONMENT: Development
      ASPNETCORE_URLS: http://+:5028
      # Points the API at the "db" service below. Overrides ConnectionStrings:FoodDb from appsettings.json.
      ConnectionStrings__FoodDb: "Server=db;Database=FoodDb;User Id=sa;Password=Str0ng_P@ssw0rd;Encrypt=False;TrustServerCertificate=True"
    depends_on:
      - db

  db:
    image: mcr.microsoft.com/azure-sql-edge:latest # ARM for the win! lol
    environment:
      ACCEPT_EULA: "Y"
      # Local development password only. Do not reuse real credentials here.
      MSSQL_SA_PASSWORD: "Str0ng_P@ssw0rd"
      MSSQL_PID: "Developer"
    ports:
      - "1433:1433"
    volumes:
      - mssql-data:/var/opt/mssql

volumes:
  mssql-data:
Reopen your project as a Dev Container and you’ll see it running in Podman instead of Docker.

N.B Running SQL Server on ARM is a whole thing. The Azure SQL Edge image I’m using isn’t even supported anymore! Hopefully this will be resolved soon.
We can also see our containers up and running using the Podman CLI:
podman ps
CONTAINER ID  IMAGE                                    COMMAND               CREATED         STATUS         PORTS                             NAMES
eb17f131e53f  mcr.microsoft.com/azure-sql-edge:latest  /bin/sh -c /opt/m...  49 minutes ago  Up 49 minutes  0.0.0.0:1433->1433/tcp, 1401/tcp  food-api-db-1
cd9ccf0e89c5  docker.io/library/food-api-app:latest    sleep infinity        49 minutes ago  Up 49 minutes                                    food-api-app-1
A Gotcha that I ran into
When I tried to run the Dev Container initially using Podman, I ran into some unsupported UNC (Universal Naming Convention or Uniform Naming Convention) path issues:
Error response from daemon: fill out specgen: getting absolute path of
\\wsl.localhost\Ubuntu\mnt\wslg\runtime-dir\wayland-0: unsupported UNC path
This caused the workspace to never open inside the container.
VS Code’s Dev Containers extension automatically adds a bind mount for the WSLg Wayland socket whenever WAYLAND_DISPLAY is set in WSL. This mount lets Linux GUI applications running inside the container display on the Windows desktop. The injected mount looks like this:
--mount type=bind,source=\\wsl.localhost\Ubuntu\mnt\wslg\runtime-dir\wayland-0,target=/tmp/vscode-wayland-<id>.sock
The source is a Windows UNC path (it begins with \\wsl.localhost\). Podman does not support UNC paths for bind mounts, so it rejects the request and the container is never created. Docker Desktop resolves these paths through its WSL integration, which is why the same configuration works there. The failure comes entirely from this auto-injected mount, not from the project’s .devcontainer files or the application code.
After getting Claude to find a solution (and the following GitHub issue), I had to implement the following fix in my VS Code settings.json file:
"dev.containers.mountWaylandSocket": false
After reloading VS Code, we run the Dev Containers: Rebuild and Reopen in Container command. The only capability lost is Linux GUI app forwarding, which my sample project does not need.
In conclusion
There’s a few more things we can do when it comes to running Dev Containers on Podman, such as resource allocation, to make things run a bit smoother. But if you’ve followed along, you should now have a working Dev Container running on Podman!
Moving from Podman to Docker is fairly straightforward. Docker does come with everything out of the box, while you need to install the Podman CLI, Podman Desktop, podman-compose etc. all separately. Other from that and some minor workarounds, the transition doesn’t require too much effort.
Depending on how deep I need to go into Podman for this engagement, I’ll write some more blog posts on it in the future. If you have to use Podman instead of Docker for your work, hopefully this has been helpful!
If you have any questions about this, please feel free to reach out to me on BlueSky!
Until next time, Happy coding! 🤓🖥️