Microsoft Defender for DevOps is a new capability in Defender for Cloud that provides visibility across multiple DevOps environments that you can use to centrally manage DevOps security, strengthen your infrastructure as code and help you prioritize critical issues in code across your pipeline and multiple cloud environments.
This feature is currently in preview, and supports GitHub and AzureDevOps (with support for more platforms coming soon). As part of my job at Microsoft, I spend a lot of time helping engineers to use infrastructure as code to provision their resources to Azure, and help them to build pipelines that automates their deployments. In previous roles, I’ve used static code analysis within build pipelines to scan for vulnerabilities in my application code, so naturally I was keen to give this feature a try and apply it to my Bicep code.
I’m a big fan of treating your infrastructure deployments the same way as you would for your application deployments. Similar principles apply, such as validating and testing your code, applying deployment gates on environments etc. so running static code analysis on your infrastructure code to scan for vulnerabilities makes sense.
In this article, I’m going to show you how you can set up Defender for DevOps, connect your GitHub account to Defender for DevOps, setting up your GitHub Actions workflow to run the scan and then publish the results of the scan to GitHub so you can remediate issues.
If you prefer, I’ve also recorded this demo on my YouTube channel:
Setting up Defender for DevOps
The first step is to connect our GitHub account to Microsoft Defender for Cloud. Head to the Azure Portal and navigate to Microsoft Defender for Cloud.
Once you’re there, click Environment settings and click Add environment. From the dropdown, select GitHub (preview).

At the time of writing, this feature is in preview. As far as I’m aware, pricing details haven’t been released yet, but for now it’s free!
One limitation of the preview is that the underlying resource can only be provisioned to the Central US region.
To create the GitHub connection, you’ll need to give it a name, resource group, set the region to Central US, select the free plan and then authorize the connection to GitHub.
Once you’ve authorized Defender for DevOps, you’ll need to install the Defender for DevOps app on your repositories. The neat thing here is that you have the choice of either installing the app on all your repositories, or just select ones.
I just picked one repository to test this, but I’ll probably open it up to more in the future.

Now that you’ve installed the app, you can start to use it within your GitHub Actions workflow (within the repository that you installed the app on).
Setting up your GitHub Actions workflow
The GitHub Action that we’ll use here is microsoft/security-devops-action. This is a CLI application that integrates static analysis tools into the development lifecycle.
Security DevOps uses a couple of open source tools, including Template Analyzer, which we will use for scanning our Bicep files.
Taking a look at the action.yml file within the Microsoft Security DevOps action, we can run this action on secrets we use in our app, application code, build artifacts, containers and our infrastructure code.
With this action, we want to be able to scan our infrastructure code for vulnerabilities and then publish any vulnerabilities so we can start to remediate them.
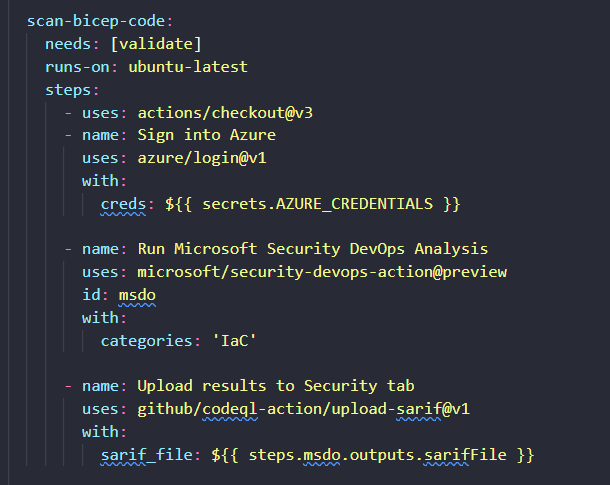
Within your GitHub Action workflow file, you can set this up like so:
scan-bicep-code:
    needs: [validate]
    runs-on: ubuntu-latest
    steps:
      - uses: actions/checkout@v3
      - name: Sign into Azure
        uses: azure/login@v1
        with:
          creds: ${{ secrets.AZURE_CREDENTIALS }}

      - name: Run Microsoft Security DevOps Analysis
        uses: microsoft/security-devops-action@preview
        id: msdo
        with:
          categories: 'IaC'

      - name: Upload results to Security tab
        uses: github/codeql-action/upload-sarif@v1
        with:
          sarif_file: ${{ steps.msdo.outputs.sarifFile }}
In the above snippet, we’re running the Microsoft Security DevOps Analysis tool and configuring it to just scan our infrastructure code, and then we are uploading the results to a SARIF results file, which will be visible in the security tab within our GitHub repository.
Viewing results and remediate issues
Once the task completes in your pipeline, you can see the results within the runner logs like so:

This task produces a SARIF file that’s uploaded to our Security tab within our repository. So rather than looking at the output logs of a step in GitHub Action runners, we can view this within the Security tab like so:

Now that our scan results have been published, we can start to make changes in our Bicep code to remediate these issues. For example, I should set the minimum TLS version on my storage account like so:
resource orderGeneratorStorage 'Microsoft.Storage/storageAccounts@2022-05-01' = {
  name: orderGeneratorStorageName
  location: location
  tags: tags
  sku: {
    name: 'Standard_LRS'
  }
  kind: 'StorageV2'
  properties: {
    supportsHttpsTrafficOnly: true
    accessTier: 'Hot'
    allowBlobPublicAccess: false
    minimumTlsVersion: 'TLS1_2'
  }
}
When I push the code up to GitHub and let the pipeline run, this issue will now be remediated and it won’t show up as an open issue within my Security tab:

Conclusion
In this article, we set up Microsoft Defender for DevOps for our GitHub account and included a task within our GitHub Action workflow file that scans our Bicep code for vulnerabilities and uploads the result of the scan so we can remediate them.
I love this feature, since it allows us to shift left and run vulnerability scans on our infrastructure code in the same way that we would for our application code. One thing I’d like to see in the future is to be able to fail the build depending on the severities reported by the scan. I couldn’t find a way to do that today, so hopefully this comes out in the future!
If you want more information on the above, check out the following articles:
- Overview of Defender for DevOps
- Configure the Microsoft Security DevOps GitHub action
- Discover misconfigurations in Infrastructure as Code (IaC)
If you have any questions, feel free to reach out to me on twitter @willvelida
Until next time, Happy coding! 🤓🖥️